PrettyRoutesPro Video Tutorial
Table of Contents
Map Setup (PrettyRoutesPro as a standalone plugin)
Placing Your Route Map into a Page or Post
Using PrettyRoutes with MapifyPro
Installation & Overview
1. Installing PrettyRoutesPro is a piece of cake. Simply navigate to the “Plugins” section of your wordpress admin, and select “Add New”.
2. You’ll then want to select “Upload” from the menu at the top of this page. On the next screen, you’ll want to click “browse” which will allow you to locate your PrettyRoutesPro zip file.

3. Once you’ve selected your file, click “Install Now” to start uploading the plugin. After it is finished uploading, you’ll click the “Activate Plugin Now” option.
4. That’s it! High five, PrettyRoutesPro is now installed. You’ll now see the PrettyRoutes tab in the left sidebar of your WordPress admin. It’s time to start creating your routes!
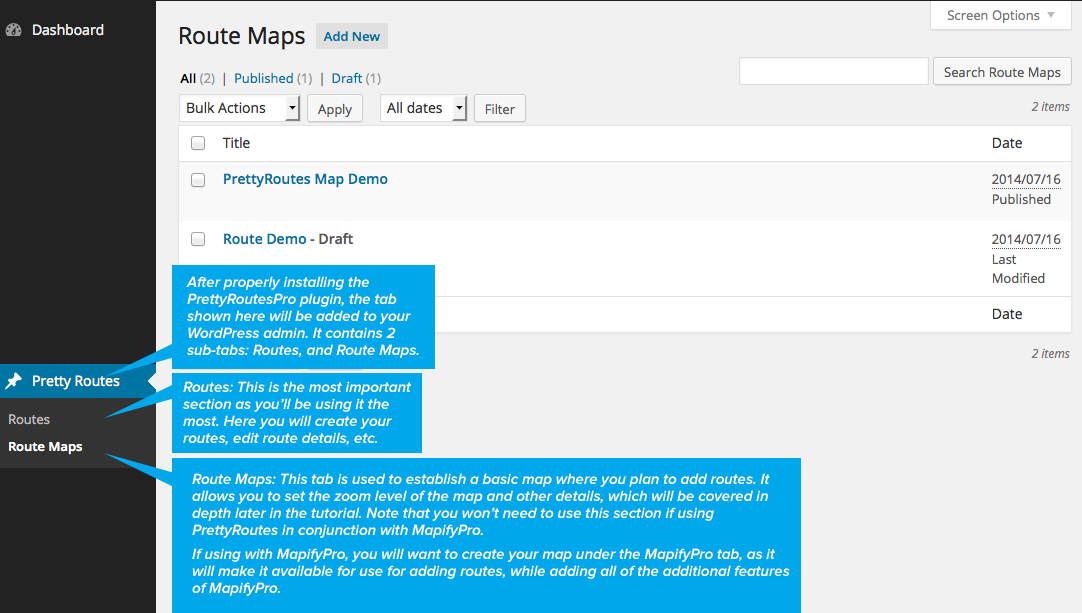
5. After the plugin is properly installed, you’ll notice a new tab has been added to your WordPress admin. See below for a general overview of what to expect:
Map Setup
Note that this section assumes that you’re using PrettyRoutes as a standalone plugin. If you are using it as an add-on to MapifyPro, you’ll want to set up your maps under the MapifyPro tab. Please scroll down to the “Using PrettyRoutes with MapifyPro” section for details on how to proceed with that setup.
The first thing you’ll want to do when setting up PrettyRoutes is to start by creating a map. This map allows you to add routes to it, and allows you to set zoom level and other details. This is important because you may include as many unique maps as you like with PrettyRoutes, each with different zoom levels depending on the topic. You can add as many unique routes to your maps as needed, in any arrangement needed. You can then have multiple maps, with different routes. So on and so forth.
Here’s how you’ll setup your first map:
1. Navigate to the subtab under your PrettyRoutes admin section called “Route Maps”. It’ll look like this:
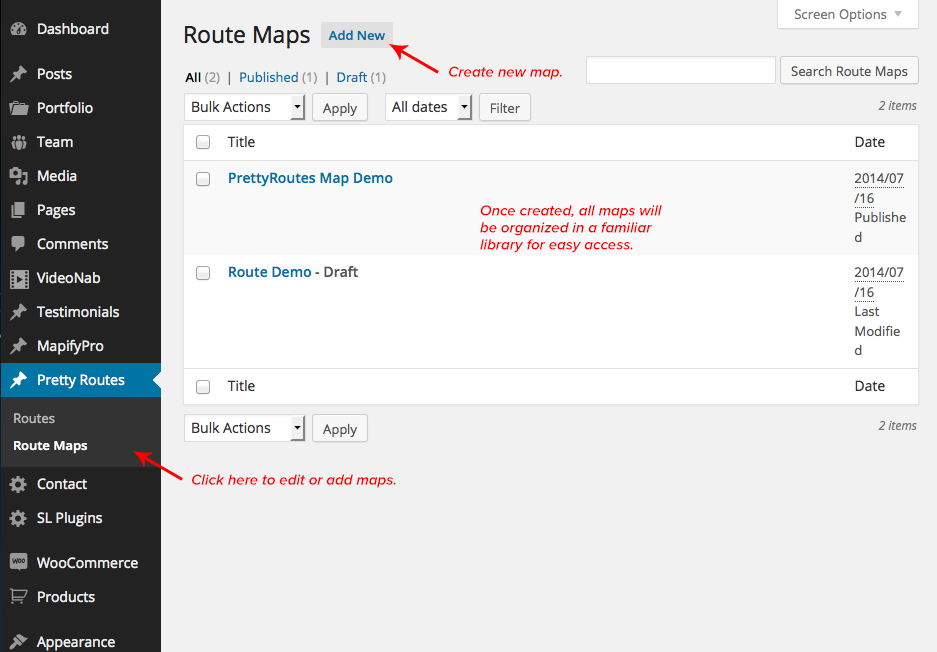
2. As indicated in the screenshot above, and just like all WordPress libraries, you’ll simply click “Add New” to create a new map. After doing so, you will be taken to the map creation page. A general overview of all items is shown below:
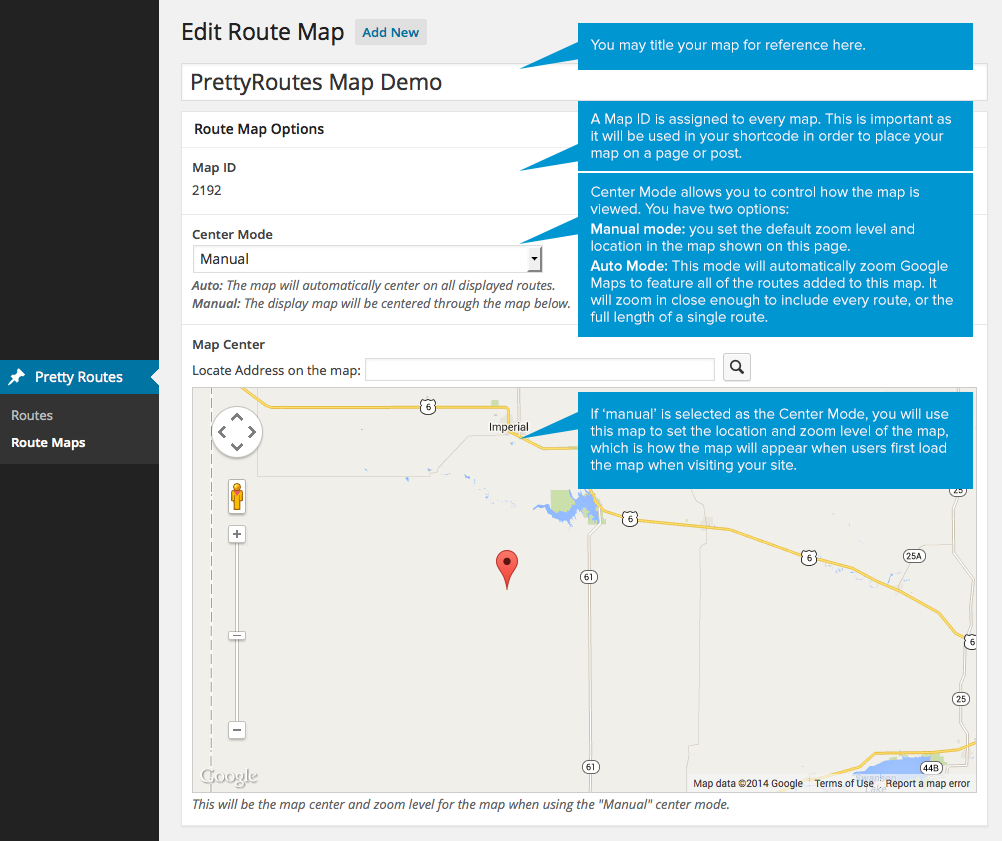
3. Upon publishing your map, it will then be available to build upon while creating your routes. It is simply added to a dropdown menu under the Routes settings. Create as many maps as you like using the methods mentioned above and you’ll be all set to create a full collection of different routes, locations, and so on.
Creating A Route
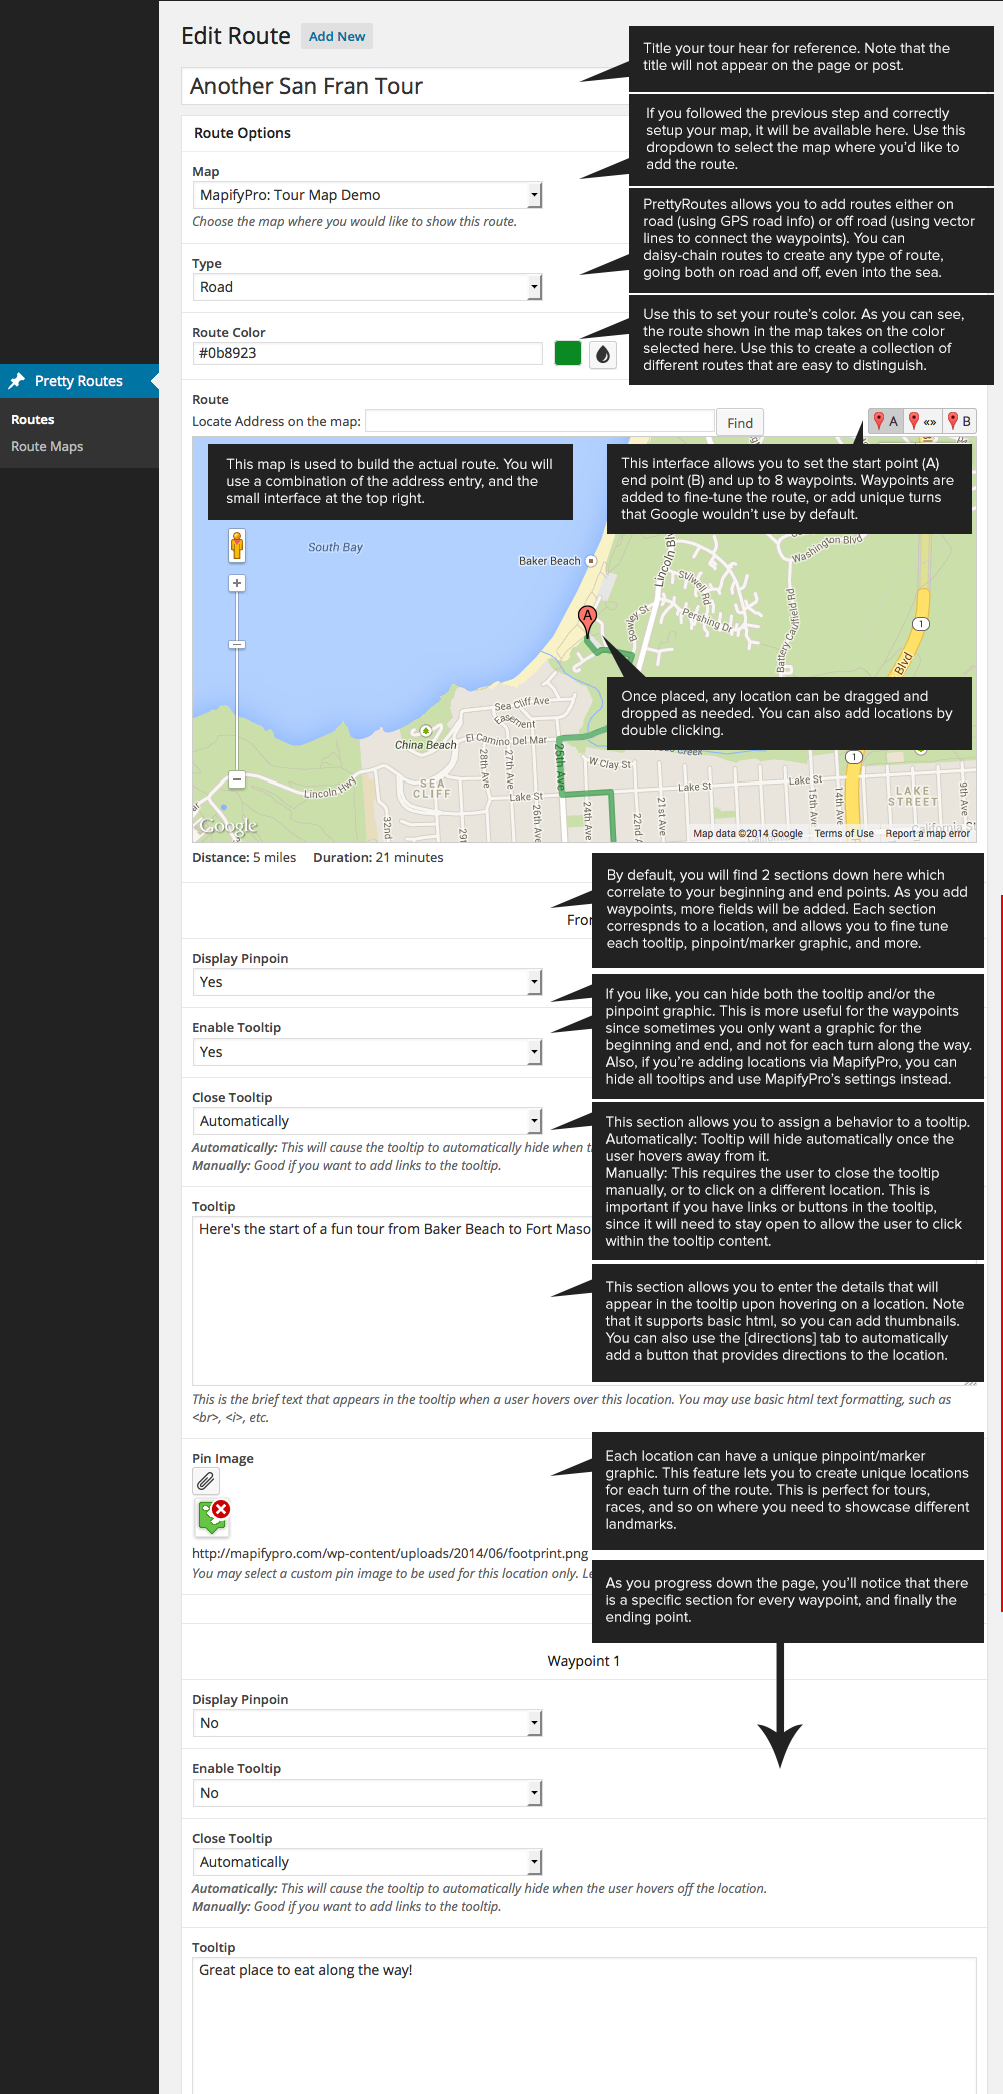
Creating a route is of course the core feature of PrettyRoutes. With this plugin you’ll be able to add as many customized routes as needed (whether off road or on) and assign a color, waypoints, and other details. Here’s how:
1. Navigate to the “Routes” sub-tab under the PrettyRoutes tab in your WordPress admin. This is where all routes will be stored in a familiar library.
2. Click “Add New” to start adding a new route. On this page, you’ll find all of the settings needed to create a customized route. The best way to showcase this is not a step by step process (that can be seen in the video tutorial at the top of this page), but to outline each feature below in the context of the page. So, check out the details below:
Placing Your Route Map into a Page or Post
Now that you’ve created all of your maps and custom routes, you’ll of course want to display them on your website. This is done via a simple shortcode, which allows you to place the map in a page, blog post, or sidebar widget. The shortcode looks like this:
[route-map map_id="494" height="500" width="700"]Things to know:
1. The Route Map ID is assigned when creating Route Maps. You can find this ID under your map settings.
2. You can set the height and with of the map based on the pixels, or by percentage. Note that this will NOT overwrite your theme’s settings, so if the theme says the page is 800px wide, and you want a bigger map, you will need to adjust the theme’s CSS accordingly.
3. If you want to display a map while using PrettyRoutes in conjunction with MapifyPro, you will instead use the MapifyPro map ID and shortcode. Please see the next section for details.
Using PrettyRoutes with MapifyPro
One of the key features of PrettyRoutes is the ability to use it as an add-on to the much more robust MapifyPro plugin. There are a few key differences in setup when using MapifyPro.
Key Differences
1. instead of using PrettyRoutePro’s maps, you will setup your map using MapifyPro. All MapifyPro maps are available in the Routes page’s dropdown where you can select a map to add a route to.
2. You’ll most likely want to hide tooltips in the route settings and use MapifyPro’s locations and settings instead.
3. You will use a MapifyPro shortcode to place the map instead of the PrettyRoutes shortcode. The MapifyPro shortcode looks like this:
[custom-mapping map_id="1783" height="300"]The ID is assigned under the MapifyPro map list. Note that you can use a combination of settings from PrettyRoutes and MapifyPro to build the perfect maps.
Key Benefits of using both plugins together
1. You can create a tour that walks the user step by step via the dropdown. This is done by:
-Creating a blank route (done by hiding all tooltips in a route
-Adding locations via MapifyPro onto the same map where the route exists
-Assigning tags to each location, and ensuring that “Automatically zoom on filter” is set to “on” in the map settings (MapifyPro > Maps)
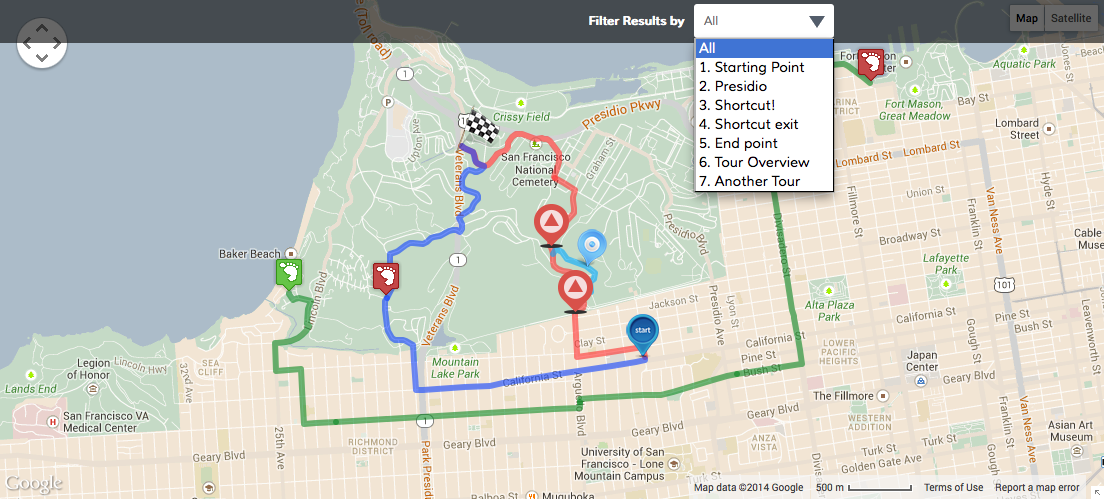
On the front end, this let’s users select the locations from the dropdown, and the map will then automatically pan to the location while hiding the others. An example of this functionality can be seen on the product page: PrettyRoutes Demo.
2. You have all of MapifyPro’s features at your fingertips. This means map clusters, sharing, pop-ups on each location, extensive details for tour locations, landmarks, etc. and so much more. Check out the full list of MapifyPro features here.