MapifyPro Store Locator Plugin Documentation
Table of Contents:
- MapifyPro: Installation
- API Key License Activation
- General Overview
- Map Settings
- Map Location Settings
- Location Tags
- Batch Upload
- MapifyPro Settings
- Adding a Blog Post to a Map
- Add Ons
- Useful Links and Support Forum
1. MapifyPro: Installation ⇧
How to Install MapifyPro:
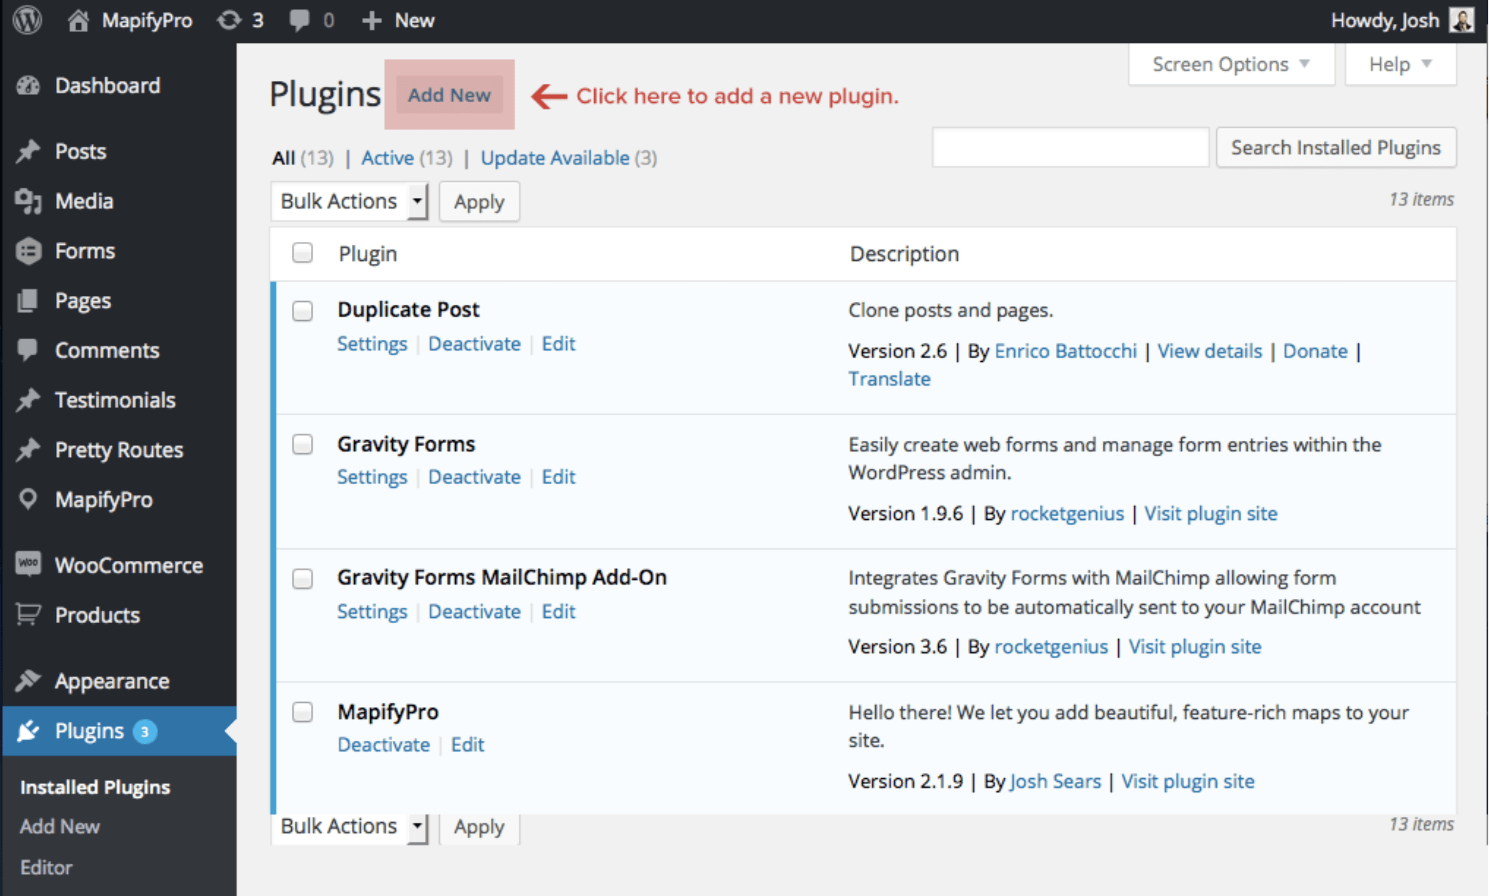
1. As with any WordPress plugin, you’ll want to upload the MapifyPro plugin file (mapifypro_master.zip) in your ‘Plugins’ tab in your WordPress admin.
2. Under the ‘Plugins’ tab, click “Add New’ as shown here:
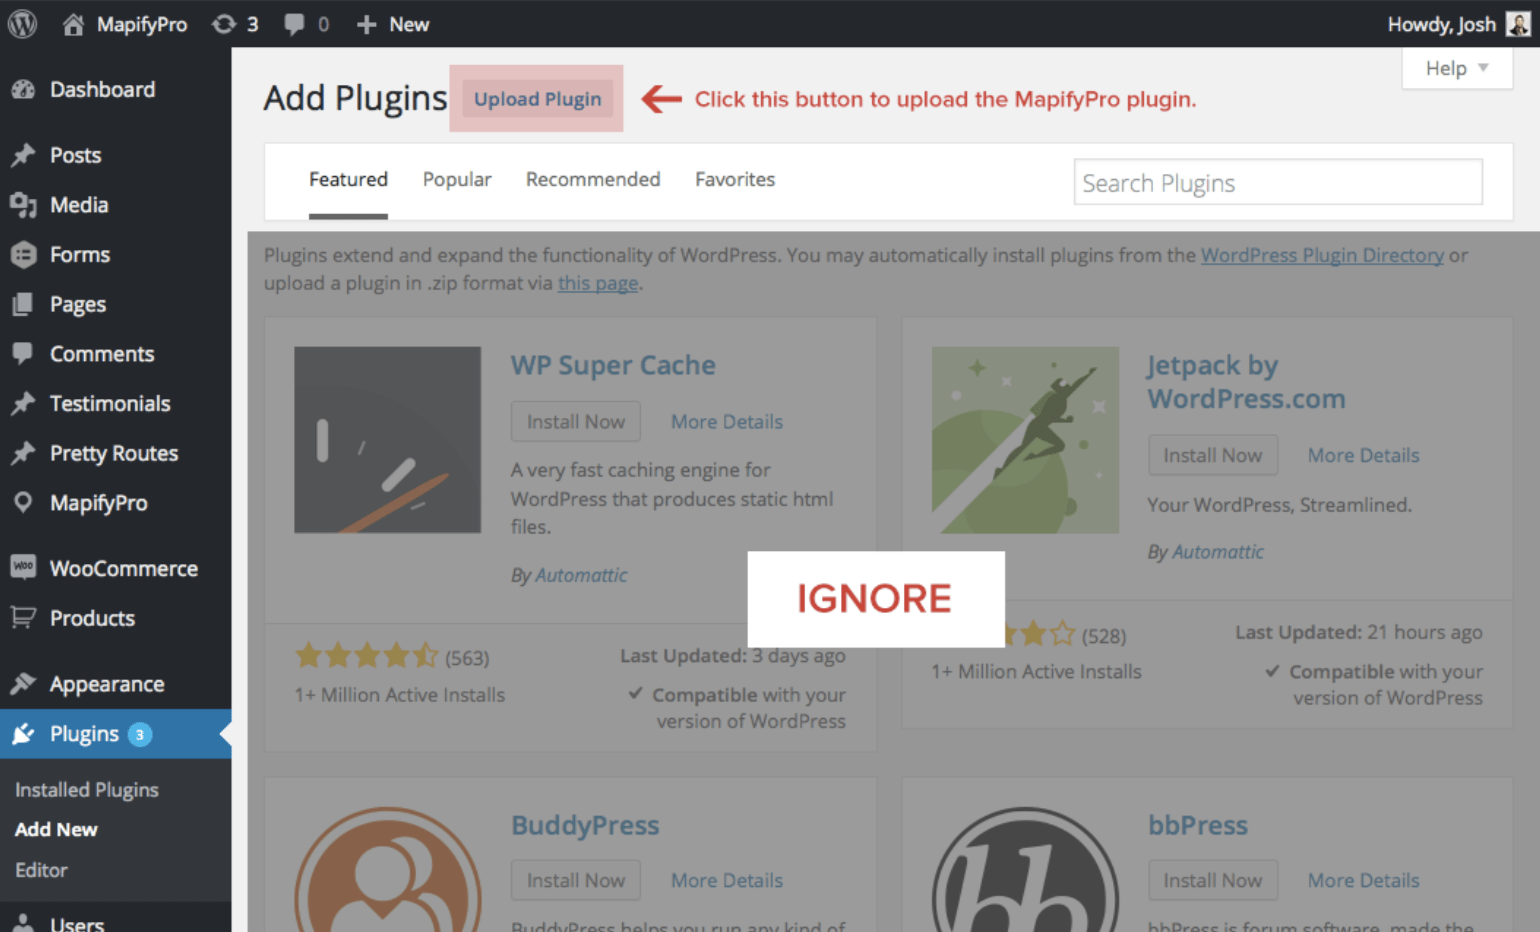
3. At this point you will see a selection of WordPress plugins, but you can ignore them and simply click ‘Upload Plugin’ as shown below (image on next page):
4. Click the ‘browse’ button and locate your mapifypro_master.zip file that you downloaded after purchasing MapifyPro.
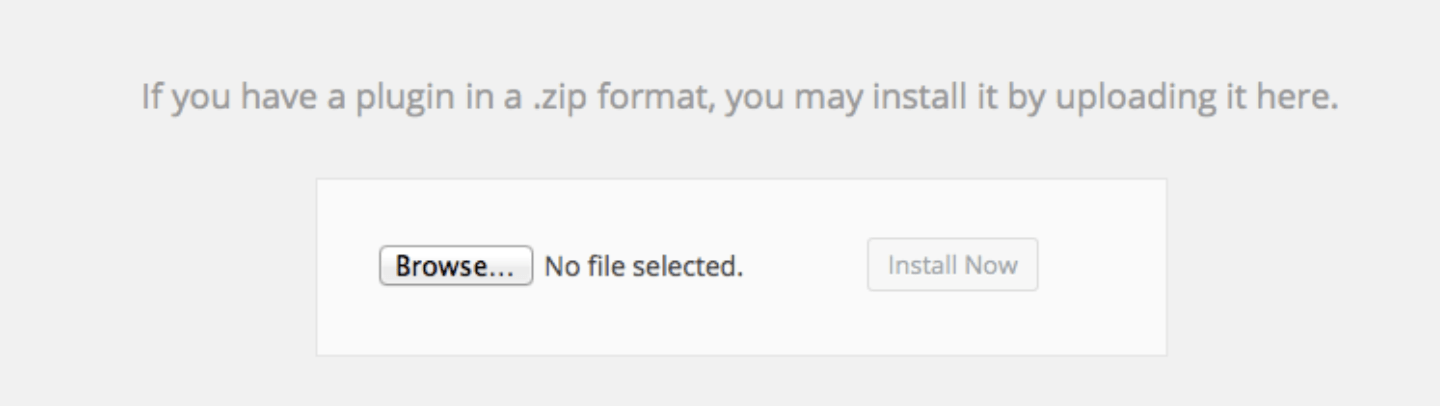
5. After the plugin uploads, select the ‘Activate Plugin’ option. That’s it! You’ve successfully installed MapifyPro and are ready to activate your API Key.
2. API Key License Activation ⇧
Now that you’ve installed MapifyPro, you’ll notice a new tab has been added to your WordPress admin. This will be where you’ll spend most of your time. However the first thing you’ll want to do is activate your license (whether it’s a single license or unlimited use license). Here’s how:
1. You’ll see a new notification at the top of your dashboard that will take you where you need to go, but otherwise: Navigate to your ‘Settings’ tab in WordPress admin. After installing MapifyPro you’ll see a new sub-section labeled ‘MapifyPro License Activation’.
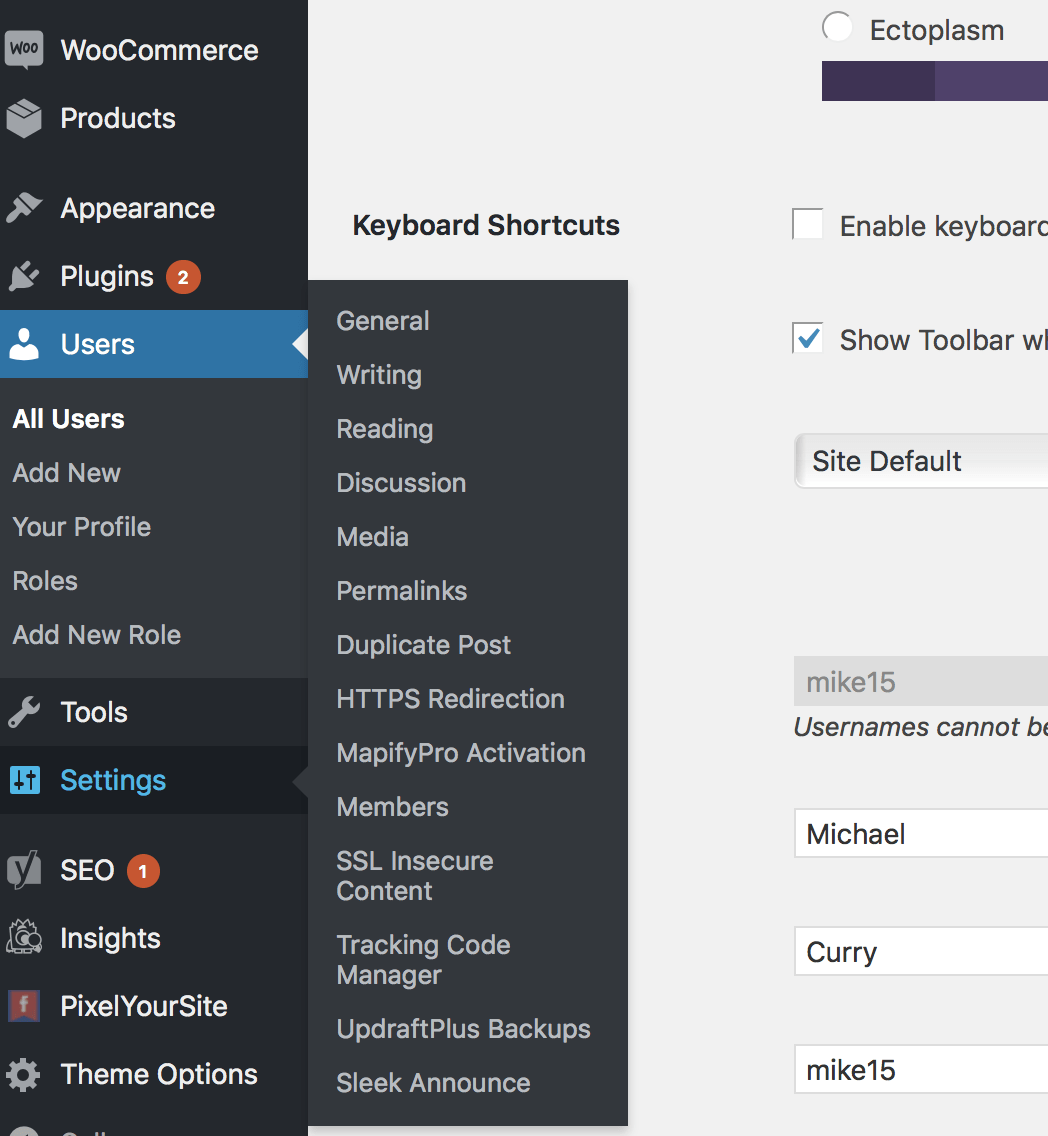
Click this tab to go to the page where you’ll enter your activation key. *Note, you’ll have received a unique license key with your purchase. You can find this under My Account > API Keys. Note that you will also need to use the same email used while making the purchase in the following step.
2. You will now see the license activation page:
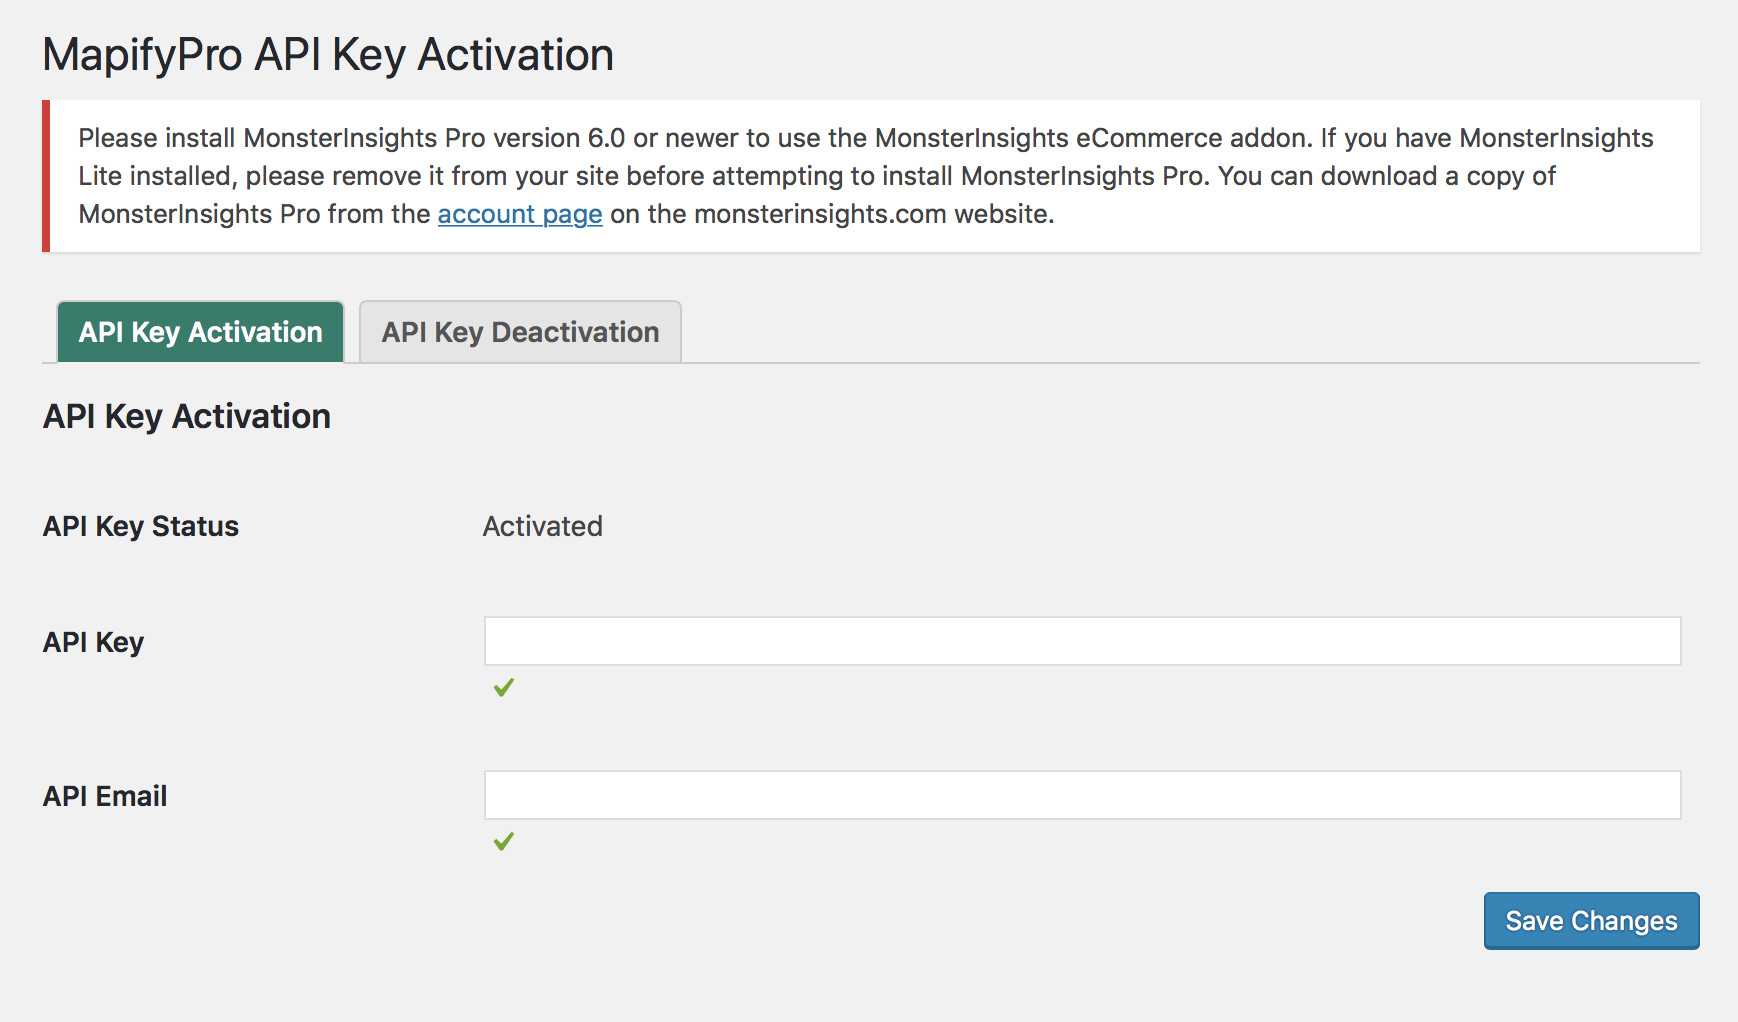
3. Tips: Note that in some cases, the ‘Deactivate API License Key’ option will be selected, which will prevent the license from being active. If you are having trouble activating your license, ensure that this option is NOT selected under the License Deactivation tab. It should look like below:

3. General Overview ⇧
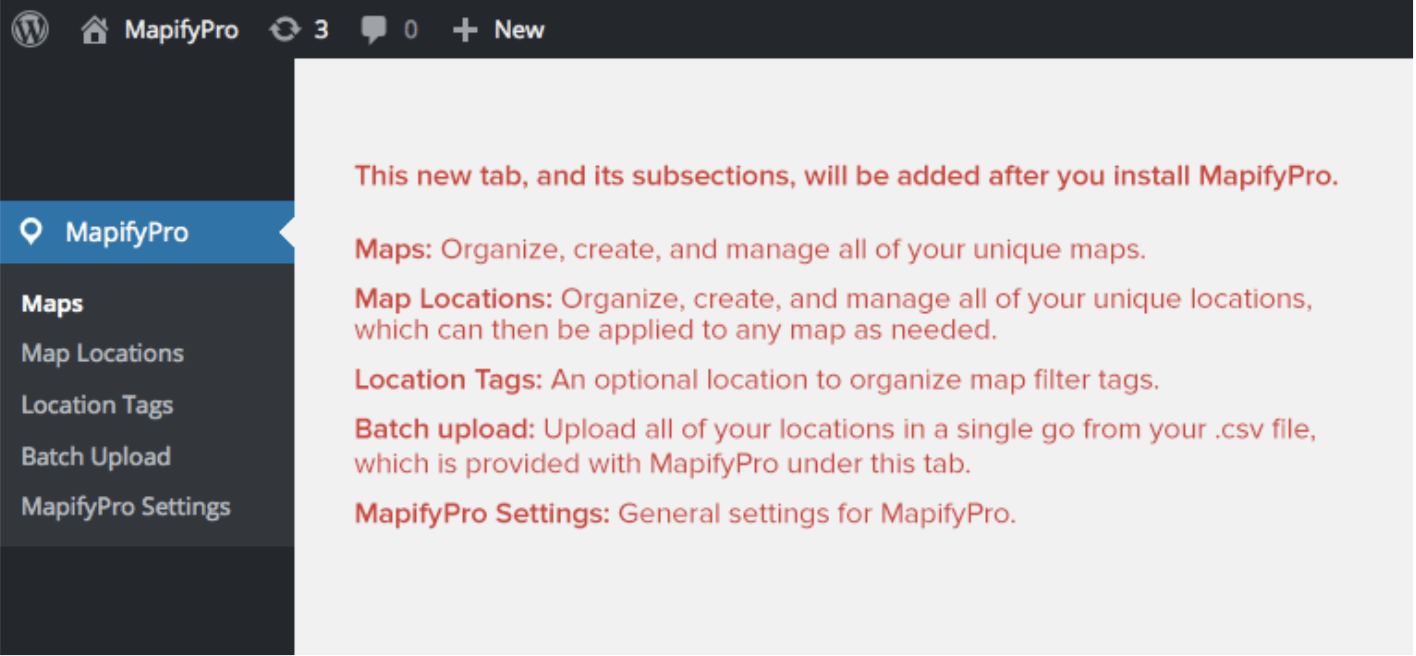
After successfully installing and activating MapifyPro, you’ll notice that a new tab has been added to your WordPress admin, titled ‘MapifyPro’. Below is a brief overview. We will cover each section in detail throughout this documentation.
That covers the basics and you should be all set to start creating your first map!
4. Map Settings ⇧
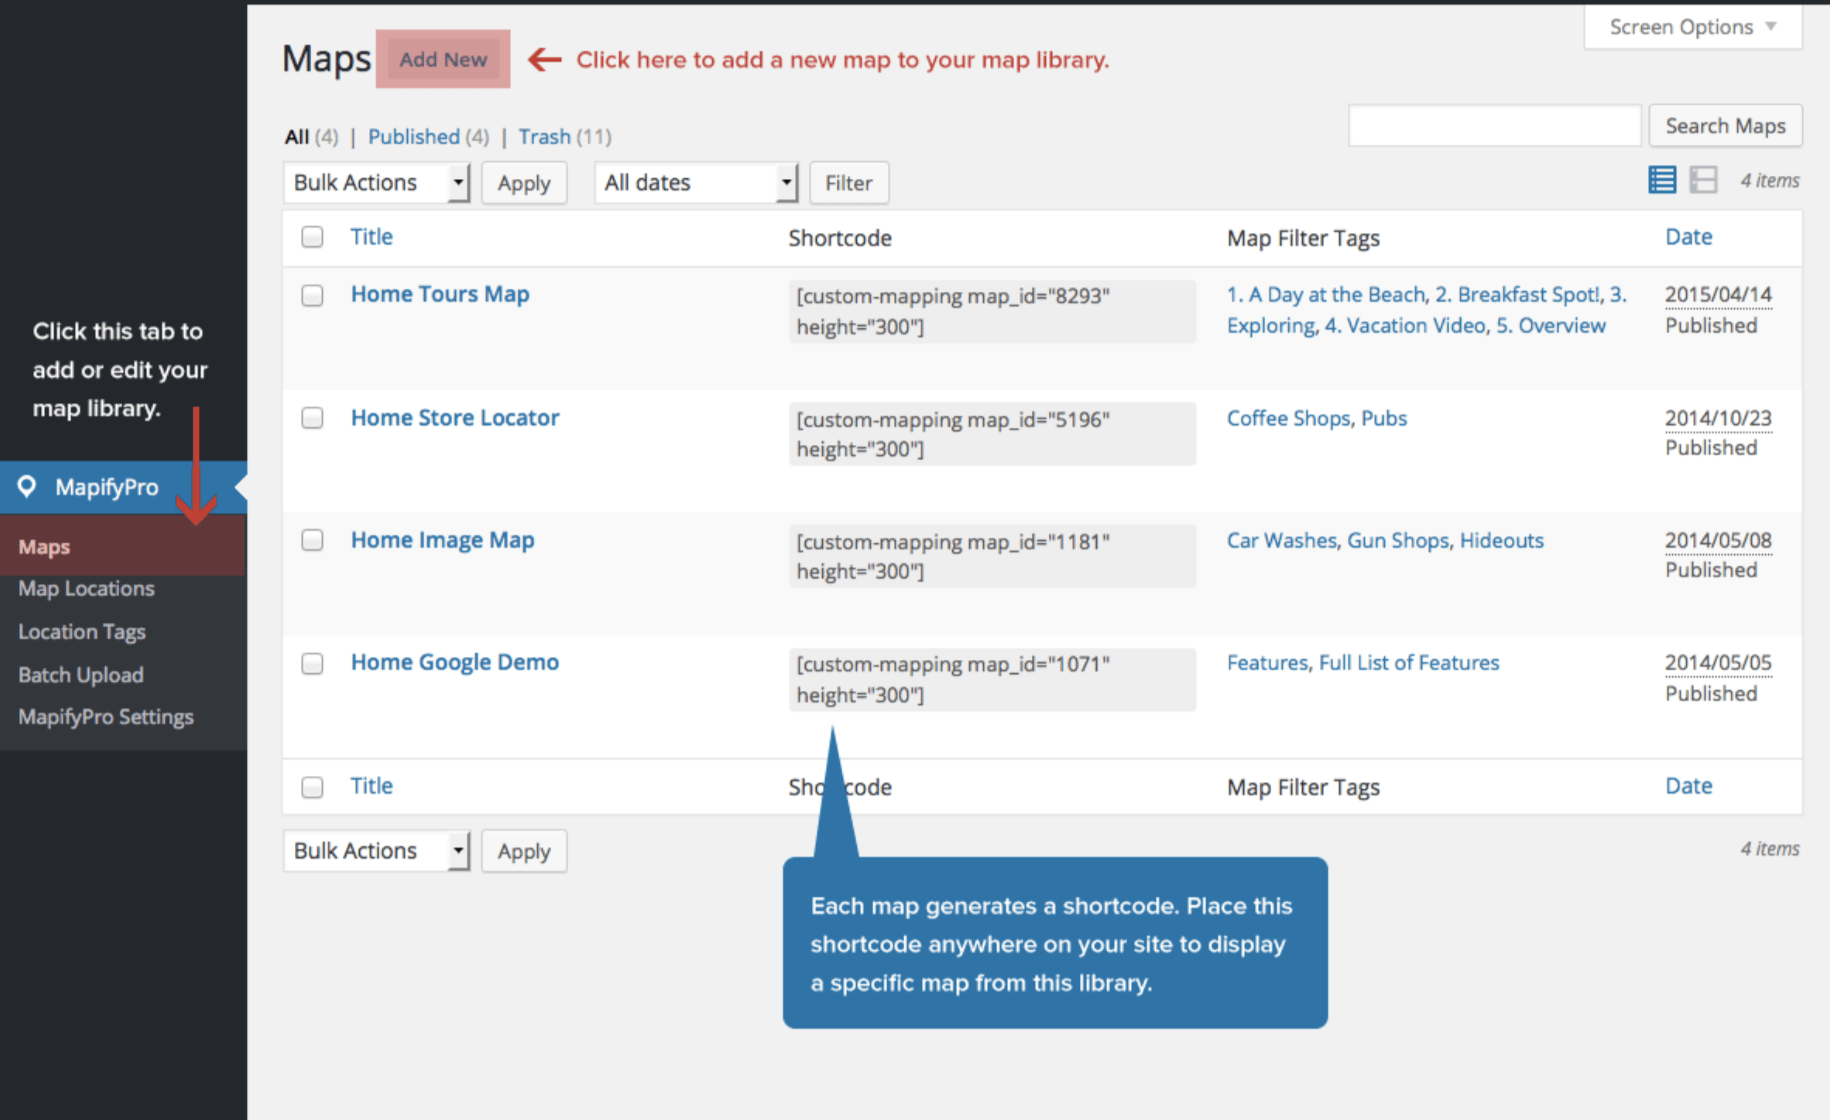
Creating a library of maps with MapifyPro is very simple, but also contains a lot of options. This section goes in depth to explain every single feature included with MapifyPro, how it works, and how creating a map integrates into the overall workflow. To start, just like many WordPress items (blog posts, plugins, etc.), you’ll simply click ‘add new’ at the top of the ‘Maps’ page to add your first map. Below is an image that showcases this button, as well as an overview of the ‘Maps’ page and how it will look after adding multiple maps. The tutorial on adding an actual map will continue below this image:
With version 3.0 and above of MapifyPro, the Map Settings section has been fully overhauled for the best user experience possible. Below we will outline every feature, and how it relates to your map:
MAP TITLE: Name you map here. This title will not display on your front-end map, so you may title it anything for reference.
BASIC SETTINGS:
This section will contain all basic items to setup your map, as outlined below:
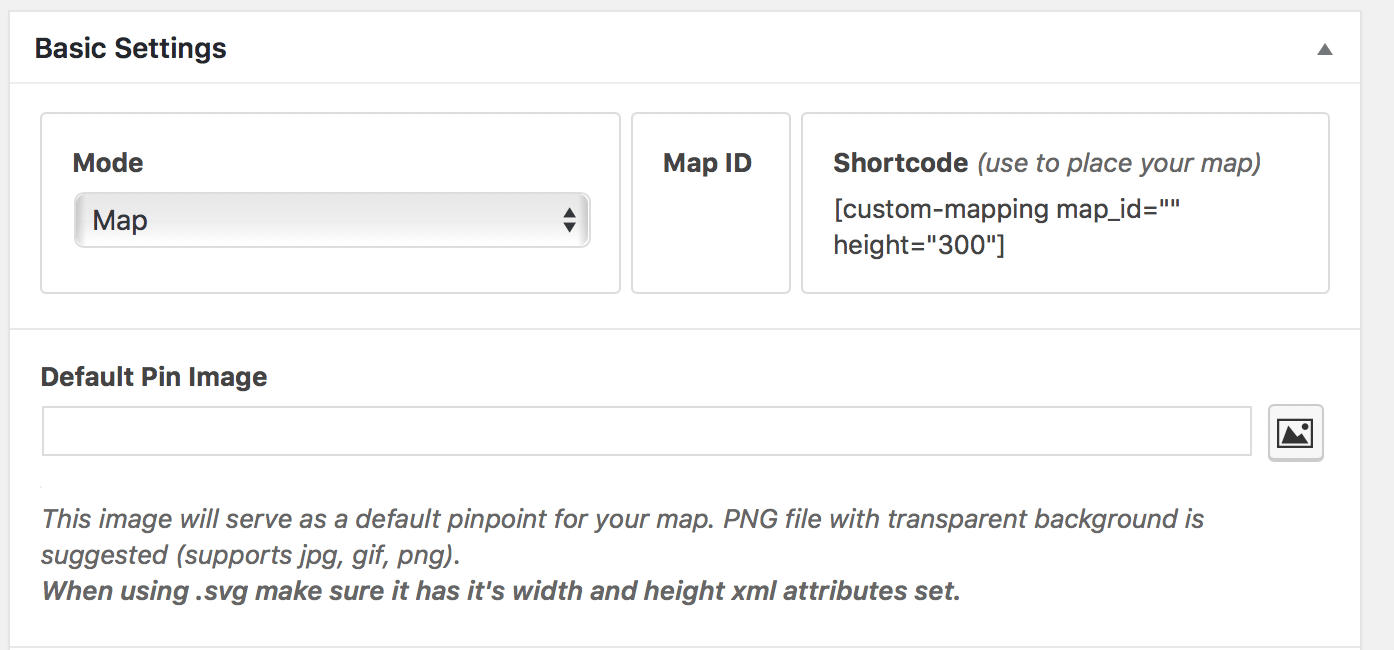
a. Mode: This is where you select standard maps, or custom image mode.
b. Map ID: After publishing/updating your map, your Map ID will display here. You don’t need to worry about this number as it’s just for reference.
c. Shortcode: This is the code you’ll use to paste your map anywhere on your site. Simply copy and paste this full code to place this specific map. Note that the shortcode contains the Map ID, and the height/width parameters (which dictate the size of your map when it displays on the front-end.
d. Default Pin Image: This is the small graphic you’ll want to use as the default pinpoint/marker for each location. You can add a different pinpoint graphic to each location, but if they are not specified in the Location Settings, then this is the graphic that will display instead. We suggest using the graphic that will be seen for most of your locations to save time down the line.
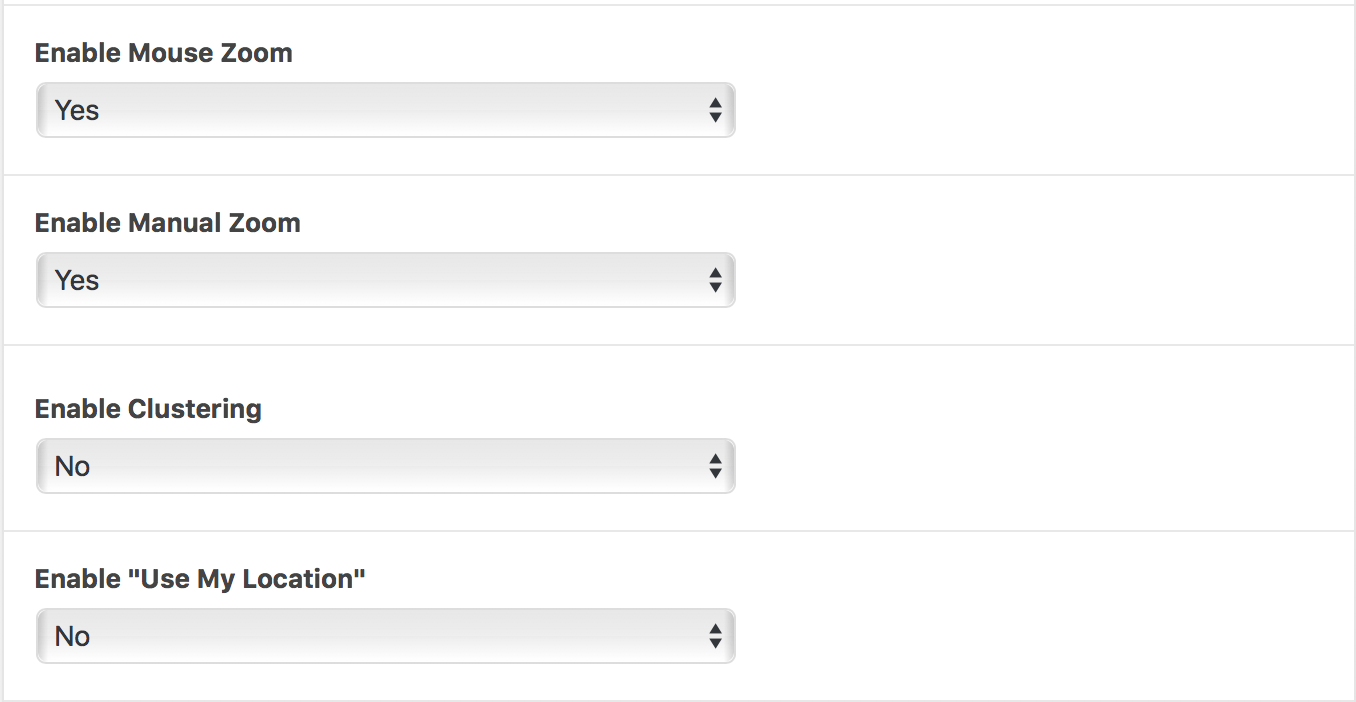
e. Enable Mouse Zoom: This enables zoom via mouse scrolling. Note that this can be annoying on mobile devices or fullscreen maps as it can cause the user to get “stuck” in the map when trying to scroll. In these cases we suggest turning this off.
f. Enable Manual Zoom: This adds the +/- icons for manual zooming on the map via clicking.
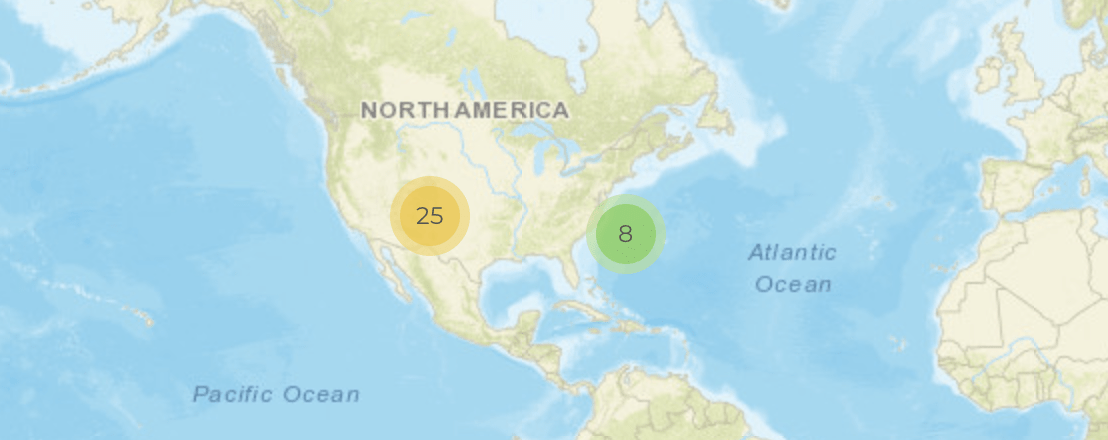
g. Enable Clustering: With clusters, multiple nearby locations will be grouped into single icons that, when clicked, will zoom in and expand to show the locations within. This is very useful for when many locations are close together. This feature is dynamic based on the zoom level.
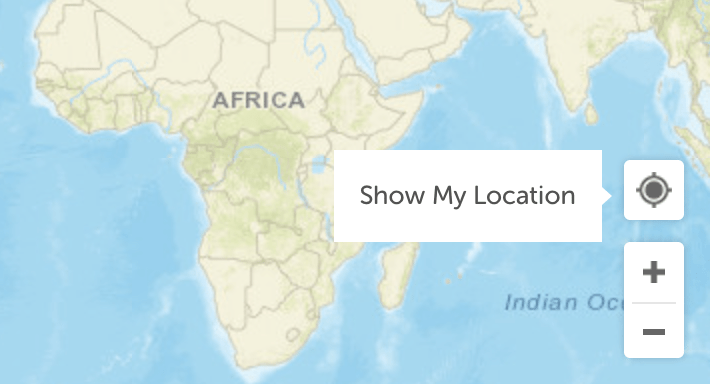
h. Enable “Use My Location”: This is a new feature for version 3.0 and above. When clicked, it will show the user’s current location. Note that this is dependent on the user allowing location services to be enabled, and also that your site is secure. Insecure sites (i.e. http://) will not work as this is a browser-enabled security feature.
i. Pop-up Text / Labels

This area let’s you change the text that appears in the pop-up after a location is clicked, as shown below:

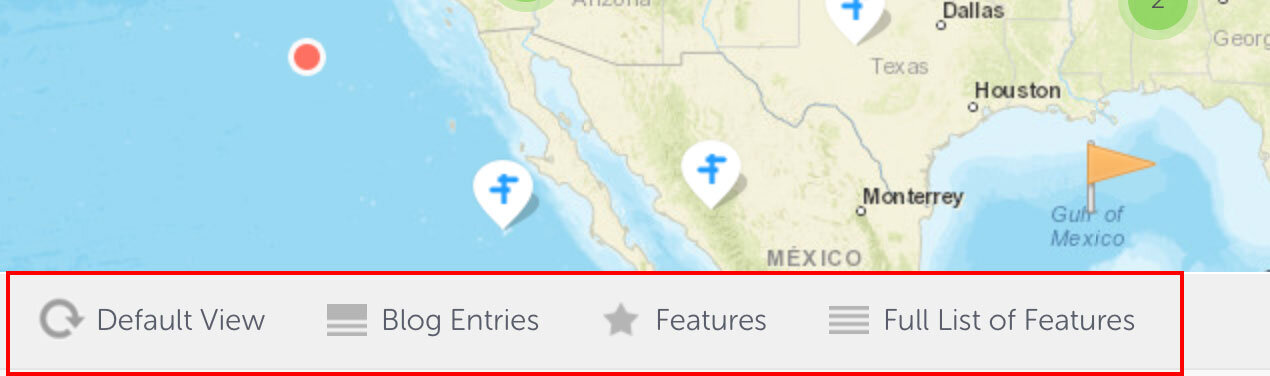
SEARCH AND FILTER SETTINGS: All settings related to filter details, and search options are contained in this section. We will outline them for you beneath the following image.

a. Enable Search: Hide or show the search area on your map to allow searching by city or zip/postal codes
b. Enable Filter Dropdown: Enable a dropdown that allows users to select filters that you’ve assigned to the map. When the user selects a filter, only those locations tagged with that filter will show. This is how it looks on Mapifypro.com:
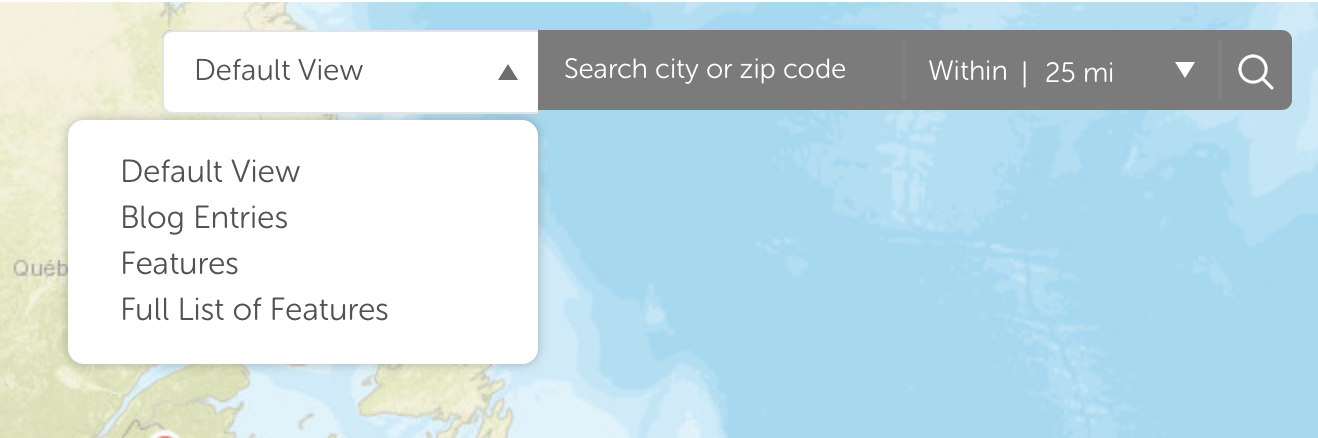
c. Enable Filter List: This has the same functionality as the filter dropdown, but adds the list beneath the map, similar to a map legend. You can assign a graphic to each filter when displayed this way as well. This is how it looks on Mapifypro.com:
d. Center Map on Search Results: When enabled, the map will center on the location(s) that appear after a user enters a search. This is very useful for mobile users and we suggest turning this on.
e: Center Map on Filters: Same as above, but when selecting filters.
f. Text / Labels: This section lets you change the text/labels that appear on the front end maps in regards to filters and the search area.
SEARCH RADIUS SETTINGS: This section contains settings related specifically to the search radius feature. This allows you to specify the granular settings of how far you want users to search, as well as specified countries. More details are included after the following image.
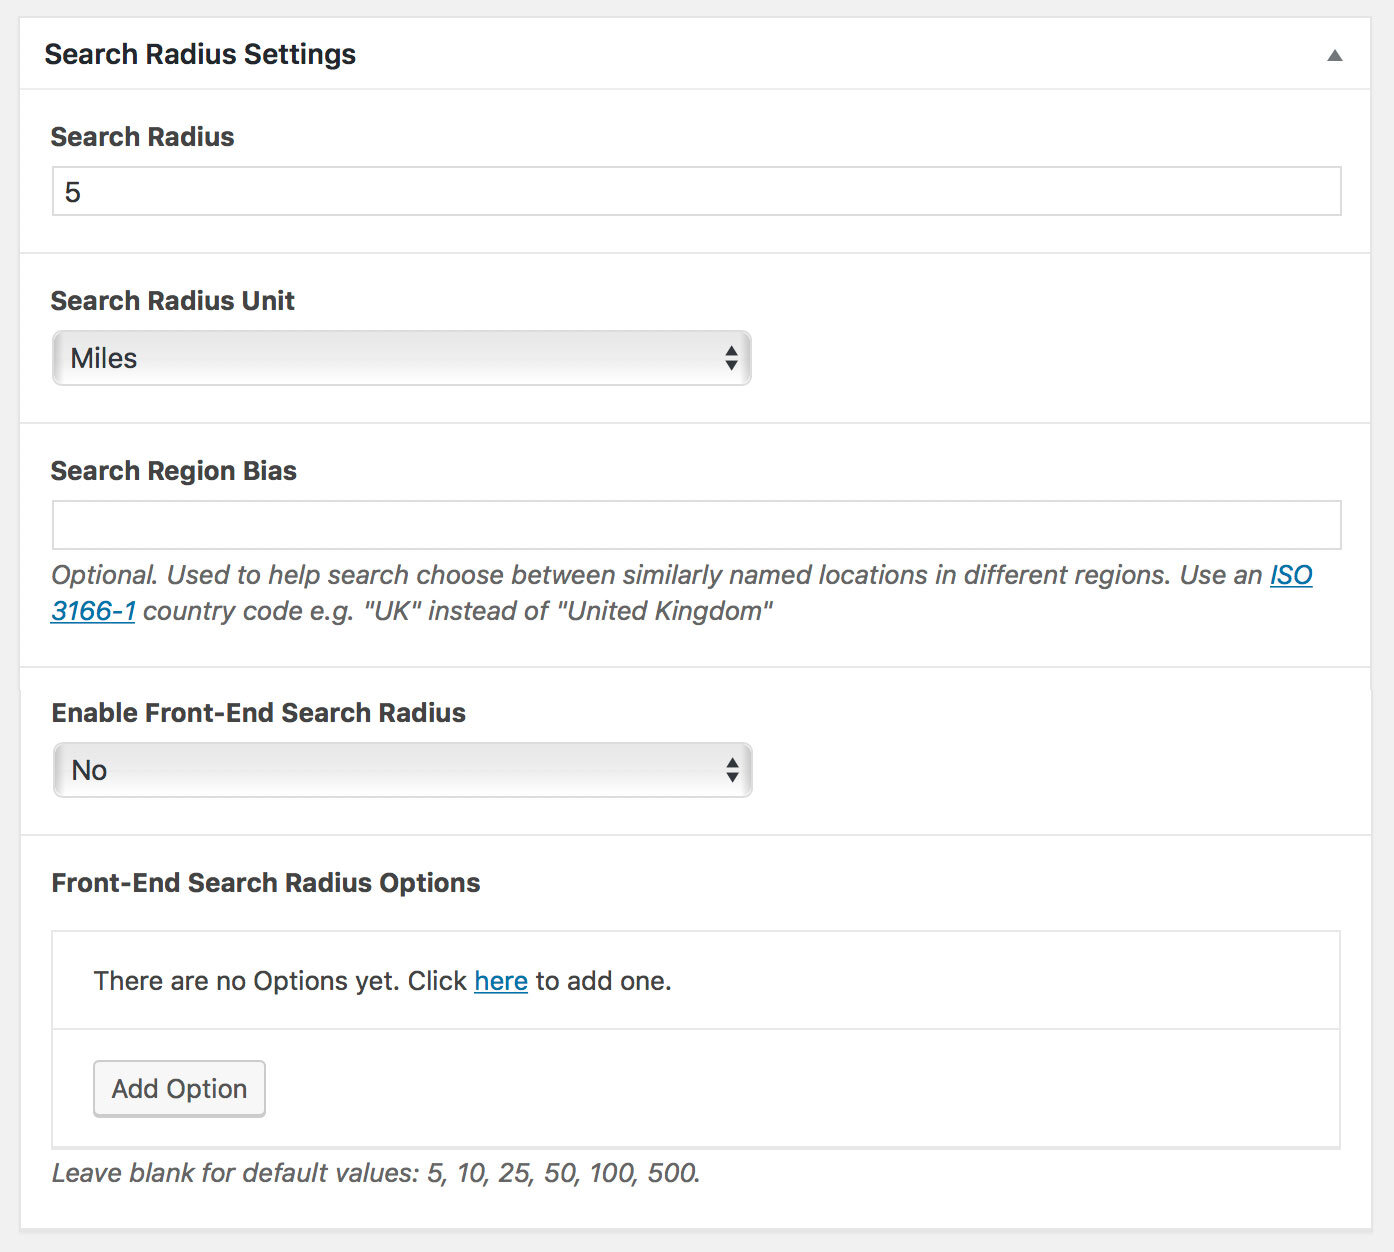
a. Search Radius: This is the default search radius in miles or kilometers. This is only important if you don’t enable specific search radius variables on the front end map (more on that below).
b. Search Radius Unit: Specify whether you’d like to use miles or kilometers. This will change the functionality of the maps in order to search in the correct unit distance, and also the labels used (miles or kilometers).
c. Search Region Bias: If you have locations in a single country, we suggest entering the country code here (i.e. UK, US, CA). This will provide more consistent search results in your specific country. You can click on the link provided there for a list of country codes.
d. Enable Front-End Search Radius: This setting allows the front-end user to specify the distance in which they’d like to search on the Mao when using the search feature. If this is not enabled, the distance will default to what you specify in the “Search Radius” setting mentioned above. If enabled, it will apply default values, but you can specify these below.
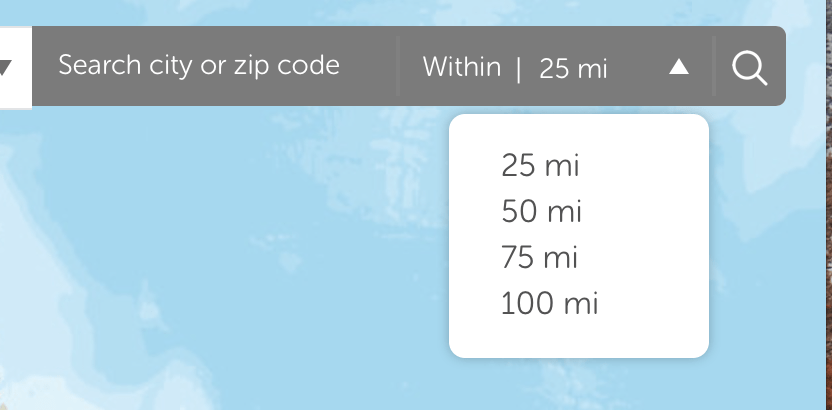
e. Front-End Search Radius Options: This is where you can specify the different search distances that users can select on the front-end. For example, you ay want to add 5 miles, 25 miles, 100 miles, 500 miles. You will add these here under each option, and it will allow your users to select those distances on the map when searching. If left blank, MapifyPro will assign default values. Here is an example of how it will appear on the map:
TOOLTIP MARKER/PINPOINT SETTINGS: All settings in regards to your tooltips and pinpoint/markers are located here. Full details are found below this reference image:
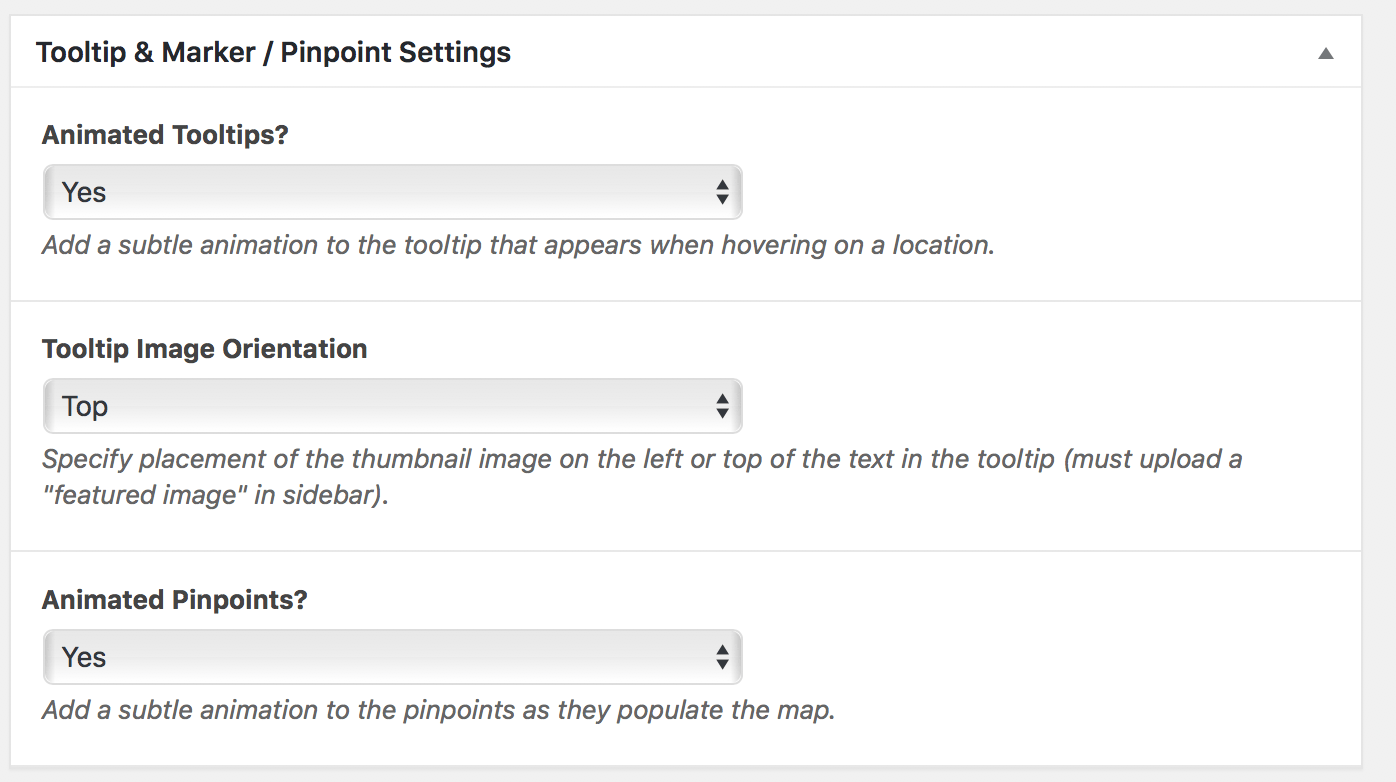
a. Animated Tooltips? When enabled, tooltips will fade in with a subtle animation. When disabled, they will instantly appear/hide with no effect applied.
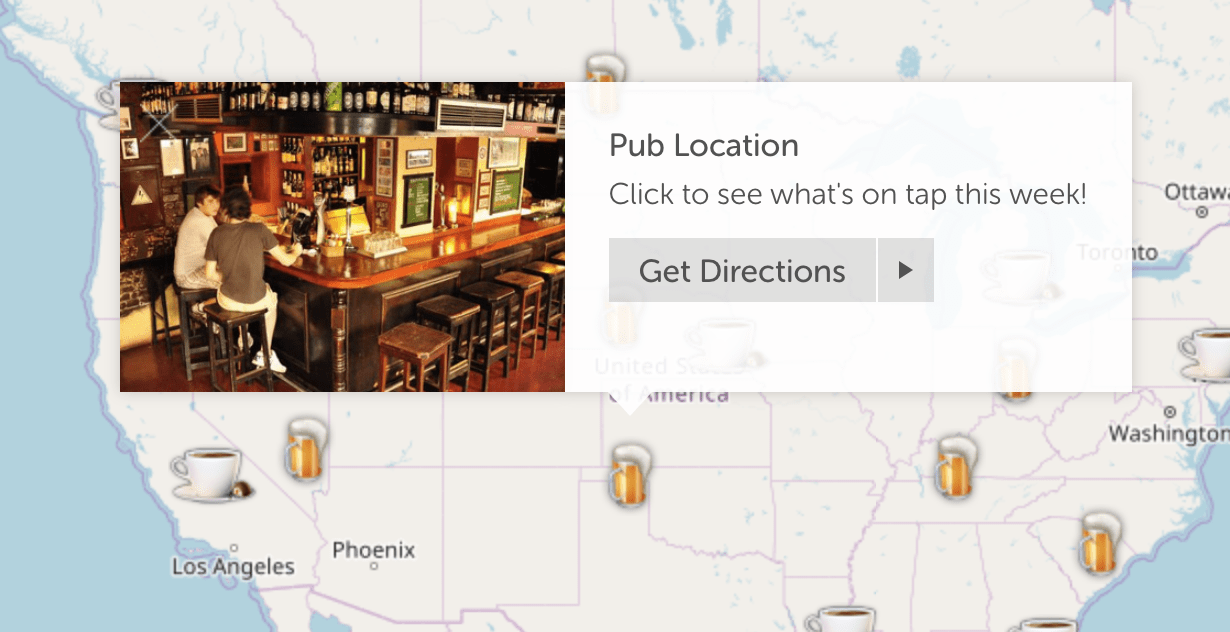
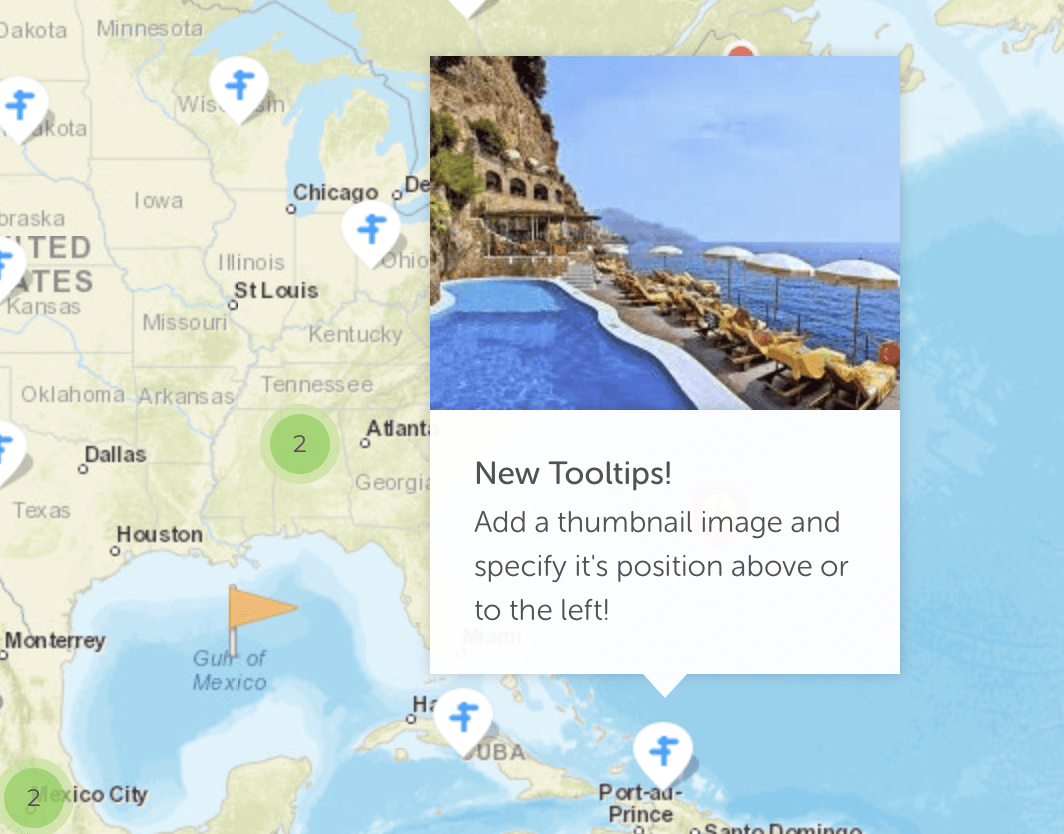
b. Tooltips Orientation: With MapifyPro 3.0 and above, you can now add a featured image to each tooltip (these images are applied in the location settings). however here you can specify whether the image will appear above the text or to the left. It also changes the general orientation of the tooltip design. Here are examples of each:
Left Orientation Tooltip with featured image:
Top Orientation Tooltip with featured image:
c. Animated Pinpoints? This setting allows you to specify if you’d like to enable the subtle tooltip animation. When enabled, the pinpoints will appear to fall onto the map with a subtle bounce effect.
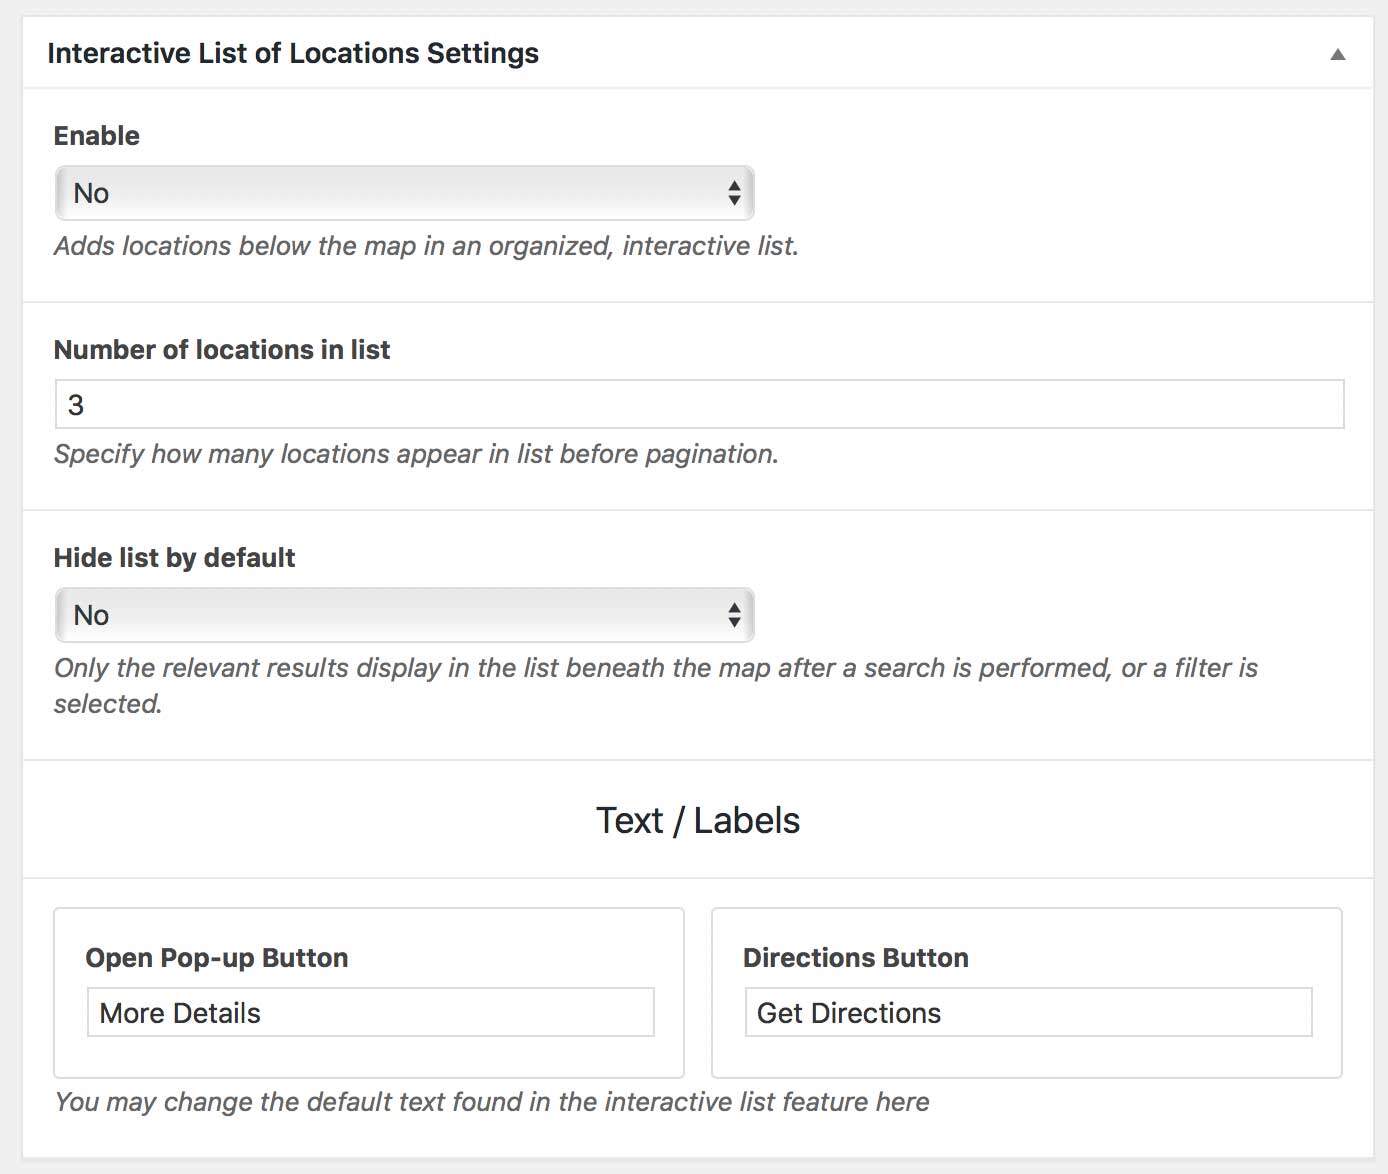
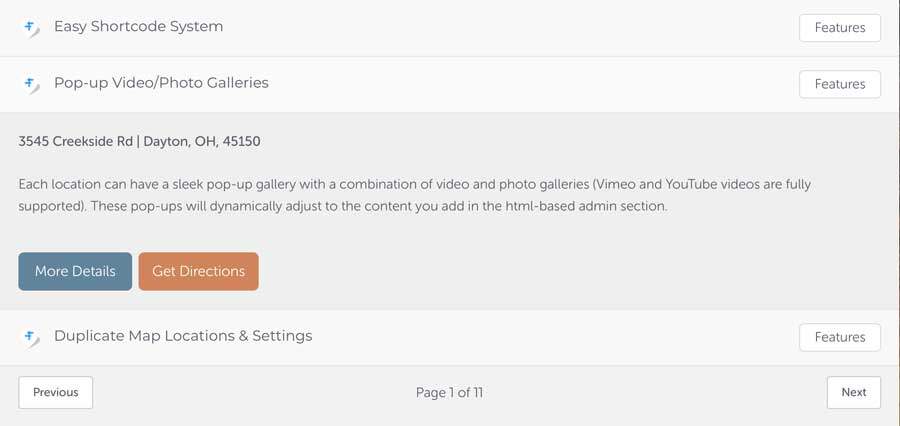
INTERACTIVE LIST OF LOCATIONS SETTINGS:
This feature relates to a fully interactive list that can be placed beneath the map. This list contains information on the location, and buttons to further interact by getting directions, or opening the “More Details” pop-up. On click, the list item will expand to show these details, as well as highlight the location on the actual map. We will describe each feature below, but here is an example of the list on the front-end map:
a. Enable: Select Yes or No to enable/disable this feature
b. Number of Locations in List: This will specify the number of items to appear on the list before pagination occurs. For example if you set this to 5, but have 25 total entries, the user will see the first five, then will need to click next to see more.
c. Hide List By Default: This will hide the list the the map is first loaded, or when “Default View” is clicked. When a user performs a search or selects a filter, the list will then display beneath the map with only the appropriate locations showing. For example, if I search “New York” then locations will appear in the list beneath the map, as well as showing the locations on the map itself. Further, locations are listed from closest to farthest, based on the user’s search.
d. Text / Labels: Use these to specify the text you’d like to appear on the 2 buttons that appear in the interactive list. By default, they will read “More Details” for the popup button, and “Get Directions” for the button that provides directions to this location.
COLOR / DESIGN SETTINGS:
Use these settings to edit the overall style of all MapifyPro elements. All details are outlined beneath the following reference image:
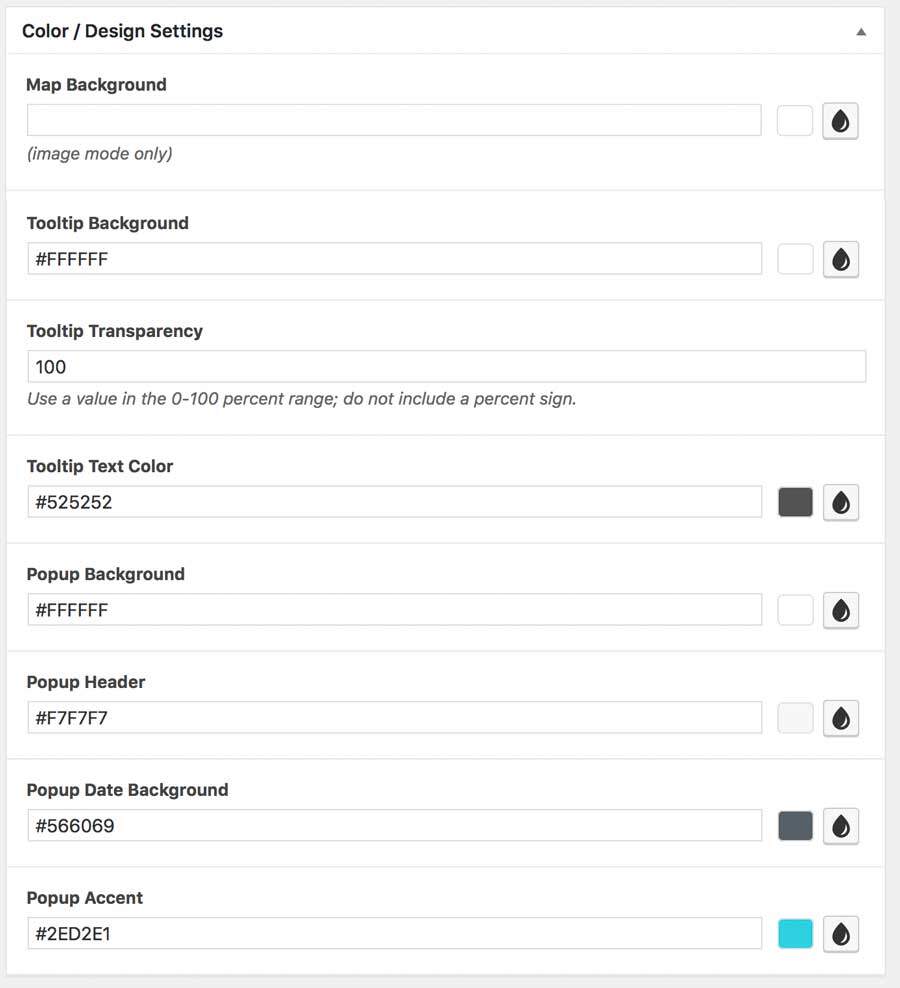
a. Map Background: This is the background that appears behind the image you use in image mode. it only applies to Image Mode, and only if you’re using a transparent PNG file.
b. Tooltip Background: This is the color of the tooltip.
c. Tooltip Transparency: Adjust the transparency of the tooltip.
d. Tooltip Text Color: Change the font color of the tooltip text. This is useful if you want a darker tooltip and lighter text color, or vice versa.
e. Popup Background Color: This is the color of the location popup’s background (default white).
f. Popup Header: This is relative to the blog article format, which has a colored bar at the top. Use this setting to change that color. Not needed for normal location popups.
g. Popup Date Background: This is relative to the blog article format, which has a colored date indicator at the top to indicate when the blog post was published. Use this setting to change that color. Not needed for normal location popups.
h. Popup Accent: This is the color of the “Get Directions” button and other minor accent colors that appear in the location popup.
MAP/IMAGE MODE SETTINGS: This section pertains to specifics related to the mode you have chosen for your map.

a. Map Mode Settings > Style: This let’s you choose a unique style for the map. We have multiple options built in that let you achieve different styles, like black and white, pastel, and other creative options. Simply select a style and you’ll see the map preview at the bottom of the page change to reflect the new style. This relates to Map Mode only.
b. Image Mode > Map Image: When in image mode, this is where you’ll upload your image to be used as the map. This works by uploading the image to our server, where it is rendered into tiles, then sent back to you. After this process, the map will then behave much like standard maps, complete with zoom affects and more. Note that after you select the file to upload, you must click “Update” at the top in order to start the rendering process. It typically take about 2 minutes. We suggest using an image around 2500 pixels wide at minimum. Larger file sizes will naturally take longer, but you’ll see a progress bar that indicates status (under the “Status” section). Once complete, you will see a message that indicates as such.
DEFAULT ZOOM LEVEL AND LOCATION SETTINGS: In this final section, you’ll specify the details on how you’d like your map to appear on first view when a user visits your map on the front end. Details are outlined below this image:
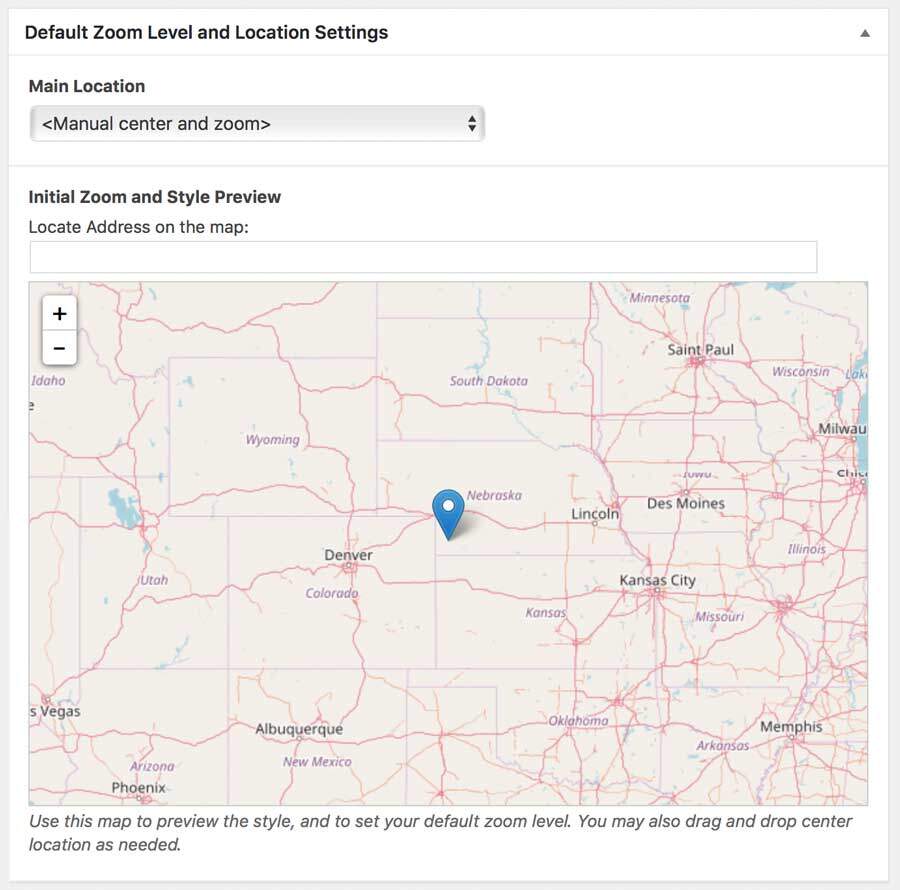
a. Main Location: This is the location where you’d like you map to center upon by default. You will find 2 options here: Manual Center and zoom: Allows you to simply click on the map to specify the center location. Existing Location: This let’s you center upon one of the locations you’ve created in your Map Location library.
b. Initial Zoom and Style Preview: This preview map has a few benefits: It allows you to specify the zoom level (which will carry over to the front-end map), it let’s you preview the style you chose from the style settings (or the image if using Image Mode), and also let’s you preview the center location of the map. If you’ve selected “Manual Center and Zoom” you will also be able to double click in order to center the map’s default location.
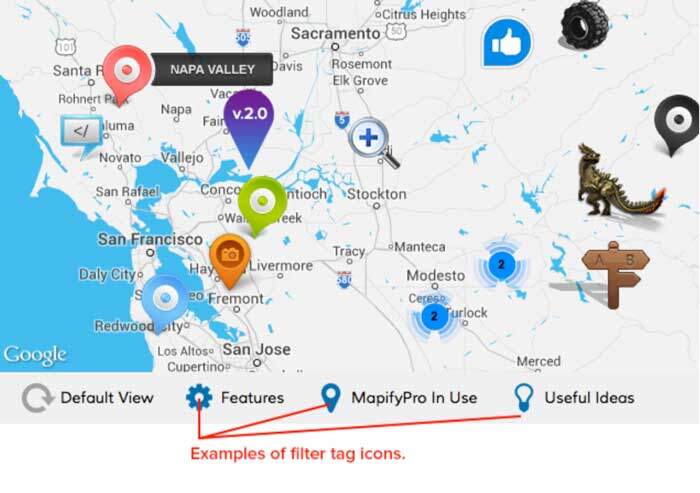
PUBLISH AND MAP FILTER TAGS (Right Sidebar): In the right sidebar you’ll find one more important MapifyPro-specific feature. This is where you’ll establish the filters that will appear on this map. Also, when all settings are updated, you’ll click Publish (or Update) to apply changes, just like a blog post. We’ll cover the filter details beneath the following reference image:
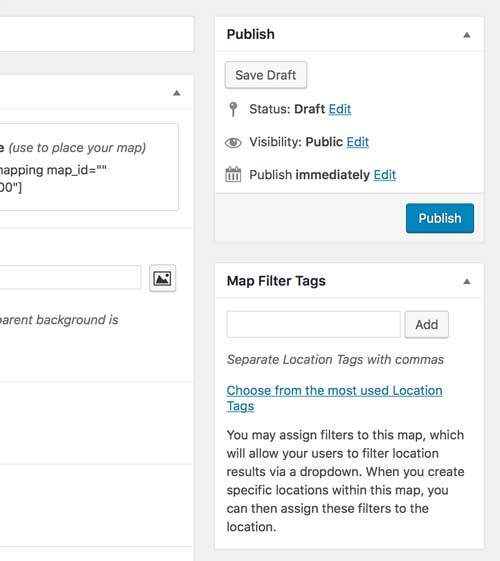
a. Publish/Update: When updating or creating a new map, be sure to click this button to apply changes, just like any WordPress page or post.
b. Map Filter Tags: In the image above, you’ll see the area we’re referring to. Creating Map Filters is a 2 step process. First, you must create the filters here in the map settings. This makes them available on the map and any location that appears on the map. Next, when you’re creating a location, you’ll then assign a tag or tags to the location (the same filters you create here). Here’s a work flow of how this would work.
In the sidebar here in the MAP SETTINGS page, I’ll add 3 Filter Tags: Hotels, Restaurants, and Pubs, clicking “Add” after I enter each. This will add the filter to the maps library of filters.
Next, I will create my location (more details on this in the next section). While creating the location, in the “Map Filters” section, I will “tag” the filter I want to apply. For example, if I create a location that is a hotel, I will tag that location with the HOTELS filter I created in the map settings. This means that on the front end map, when a user selects the HOTELS filter, the locations I tagged with the HOTELS filter will then show on the map. The same goes for Pubs, and Restaurants.
Filters can be combined as needed for various results.
That covers your map settings! After you’ve made all changes, simply select “Publish” and your map will be available to place anywhere on your site! But first, you’re going to want to add locations, so that’s what we’ll cover next.
5. Map Location Settings ⇧
Assuming you’ve created at least one map, it’s now time to start adding locations! Below you will see an overview of what to expect when you click on the ‘Map Locations’ sub-section of the MapifyPro section found in your WordPress admin.
Similar to adding a map, you’ll want to click the “Add New” button on this screen to add a new location to your map(s). The next section will outline each feature available while adding a new location, how it works, etc. Here’s an overview:
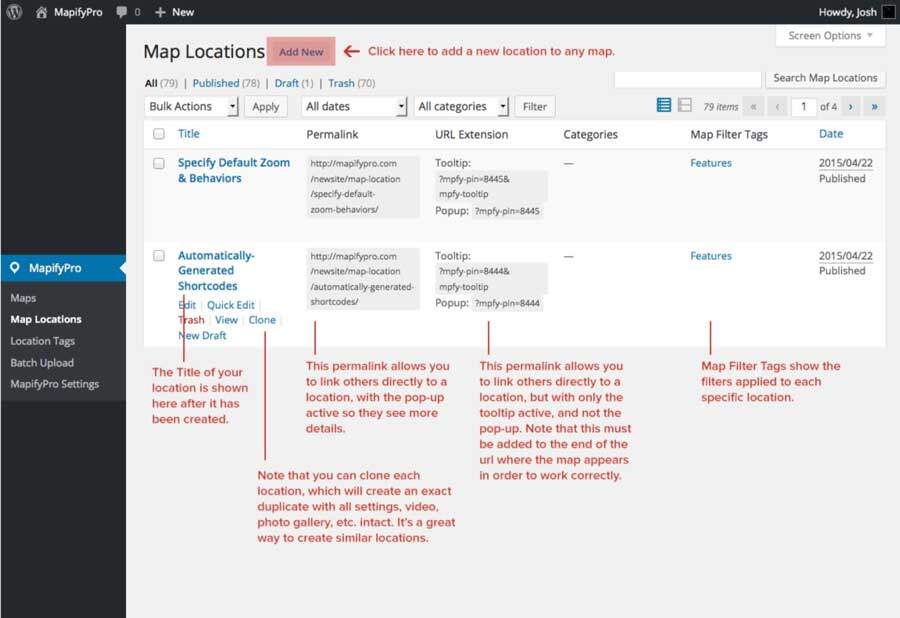
When clicking “Add New” or editing an existing location, here is a complete list of what you’ll find on the location settings page:
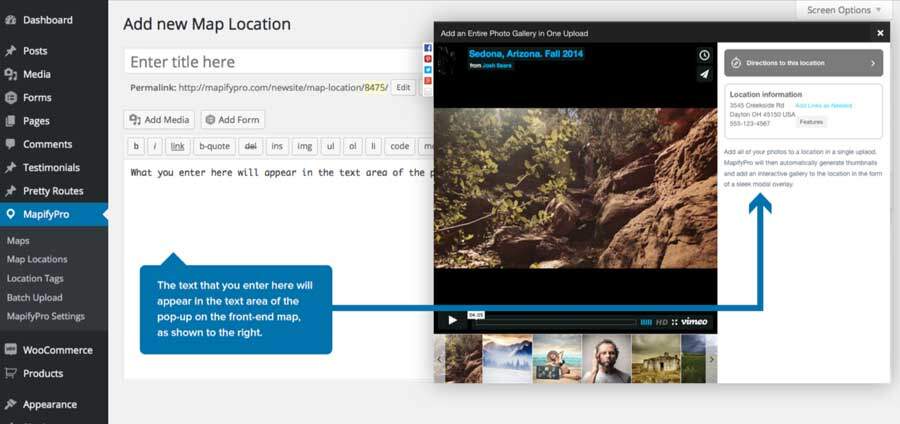
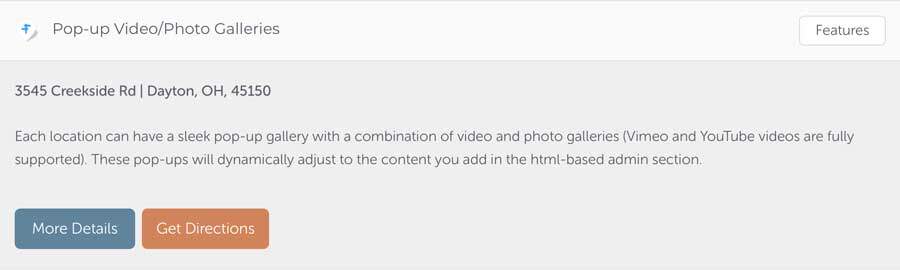
TITLE: Like a blog post, you can title your location here. It will appear at the top of the tooltip, as well as the pop- up gallery, if you’ve enabled a pop-up.
DESCRIPTION: Again like a blog post, you may enter text and other html-based items here (such as images). Items entered here will appear on the text area of the front-end map gallery popup. See below for more details (image on next page).
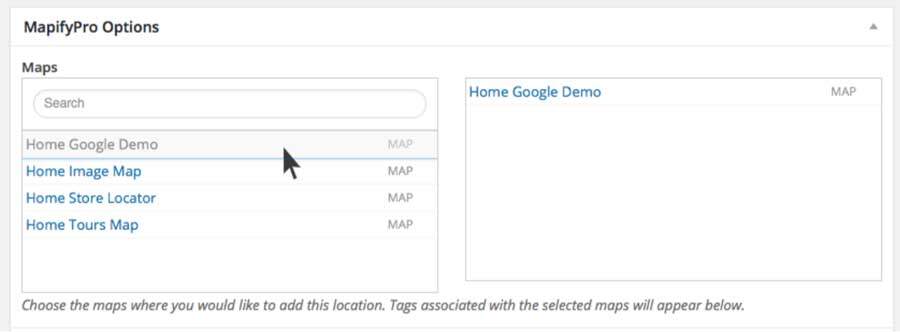
MAPS: This section contains all of the maps you’ve created thus far. You can add the location to any map you like in a single click, which comes in handy if you want to add the same location (with the same settings) to more than one map. To include the location on any map, simply click on it until you see it move to the right category, as shown below.
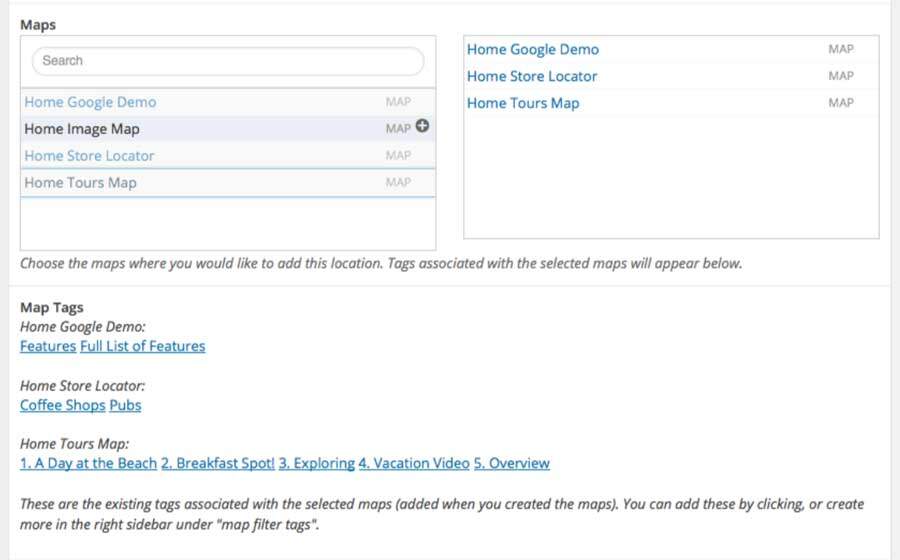
MAP TAGS: ‘Tags’ in the case of MapifyPro, almost always applies to filters. As outlined in the last step of the MAP SETTINGS section above, these filters are added to the map in order to allow visitors to click on them from the drop down menu or filter list (see previous section ‘Maps’ for more details). You should have already added the filters while creating the map, which will make them available here to “tag” the location. This means when a specific filter is clicked, this location will be included.
Sidenote: Since you can add a location to multiple maps — each potentially with their own unique tags/filters — then these will be grouped by map below this section. In the following example, we show the case where we added the location to 3 different maps, each with their own set of filters/tags. Note how they are grouped accordingly, allowing you to tag this location as needed for various filtering behavior on each map:
Enable Pop-up: Display or hide the gallery pop-up for this specific location. Set this to No if you don’t want a pop-up to appear after the visitor clicks on the map marker.
Take visitor to another page on clicking location? Allows this location to link to another page/site on click. Use this to take visitors directly to another page rather than showing the pop-up.
Enter URL: If using the option above, this is the url where the visitor will be taken upon clicking on a map location.
Open In New Window/Tab: Allows you to specify if the link should open in a new window or tab.
Enable Tooltip: Display or hide the tooltip for this specific location. The tooltip is the small amount of info that appears when a visitor hovers over a map location.
Close Tooltip: This setting controls the behavior of the tooltip.
Automatically: This will cause the tooltip to automatically hide when the user hovers off the location. Manually: Good if you want to add links to the tooltip.
Include Location Information: Toggle whether to include address, phone number, and other details on the pop-up gallery.
Include Directions: Specifies whether to include the Directions button in the pop-up, as shown above. Set to ‘No’ if you prefer to hide this button. You can refer to the image above to see an example of the directions button.
Tooltip: This text field allows you to add content to the tooltip, which appears when a visitor hovers over a location on the map. Note that you can use basic html here as well. This will be organized below the location title, as shown below (note that you can change the orientation of the tooltip image in the map settings. Tooltip image is added to the “Featured Image” section in the right sidebar):
Include on Selected Map(s) Location List? Specify if this location should be included on a map’s Interactive Location List, which appears beneath the map.
Short Description: On the Interactive Location List (shown in the image above), when a location is clicked it will expand to show more details, and a snippet of text. Here’s an example of the front-end version. It is the text beginning with “Each location can have…”:
Pin Image: This allows you to upload a unique map marker/icon for this location. It will overwrite the default pin image you set on the map settings. Leave it blank if you’d prefer to use the default image you assigned while creating your map(s).
Video Embed Code: Each location can have a single video either from Vimeo or YouTube. Use Vimeo or YouTube iframe video embed codes to include a video in your location’s pop-up gallery. If left blank, the gallery will revert to an image gallery only (if adding images). If no images or video are added, then the pop-up will dynamically adjust to only display text.
Gallery Images: This section allows you to add as many images to the pop-up gallery as you like. Even better, it allows you to add them all in a single action. Simply click “Add Images” and you can either select them from you media gallery, or upload them. MapifyPro allows you to select all images to be included, and will automatically generate the gallery, thumbnails, and image sizes for the pop-up. Note that you can have any combination of images, video, and text, and the pop-up will dynamically adjust to accommodate with a proper style and layout.
Note that you can use the pop-ups as a gallery only, meaning images without the text. You’ll just leave the main info area at the top of this page blank, and MapifyPro will automatically adapt to display like a common gallery pop-up.
Location: This is where you plot the location on the map, whether by entering an address or simply double clicking on the map itself. Alternatively you can drag and drop the location on the map to fine tune the placement. When using custom image mode, a preview of the image used in you map settings will appear here so you can see where to place your location (since images obviously don’t support addresses).
Note: The zoom level of your map is set in the map settings.
Phone, Address, City, State, Zip, Country, Links: All of these settings are what appear in the “Location Information” section of the pop-up gallery. In addition to common details, you can also include external links, such as yelp reviews, author links, etc.
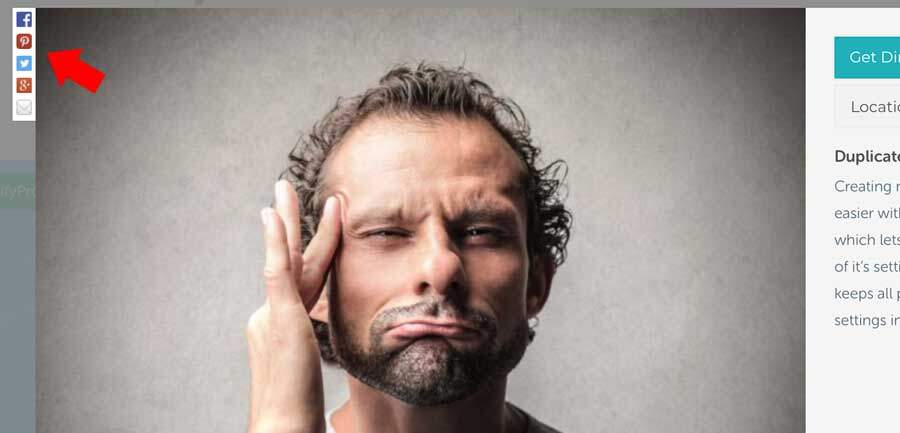
Share Services: Specify which social media options you’d like to include on the pop-up gallery, which encourages viral marketing and sharing to help spread the word and get traffic. You can select the exact social media pages you’d like to enable sharing for, and a corresponding icon will be added to the popup as shown here:
The Location Settings Sidebar: There are a couple more options in the right-most sidebar of the map location settings page, which we’ll cover here:
1. Categories: Since each location is an actual post, and behaves as such, you can add a location to your blog. This will create an article-style version of the location details you’ve just entered, and allows you to feature the “story” on the map and on your blog. The categories section allows you to place the location, in article format, under a specific category that you’ve created for your blog. So, when the user is reading your blog and clicks this category, they will see a list of map locations in article format. This is very handy for travel bloggers.
2. Map Filter Tags: When you click on a map filter from under the corresponding section on this page, it will be added here. You can also remove them if you prefer, which would exclude the location from being featured when the filter is clicked on the front-end map.
3. Featured Image: This is where you’ll add an image that will appear in the tooltip as a thumbnail. Simply click her to upload the image, and MapifyPro will render it to properly display on your tooltip.
6. Location Tags ⇧
For the most part, you will assign and tag your filters under the Map and Locations settings. However, they will also be grouped here for easy management. More importantly, if you’re using the “Map Filter List” feature — which allows you to include a visual “legend” beneath the map — this is the location where you’ll assign images to the filters. Here is an overview of what you’ll see:
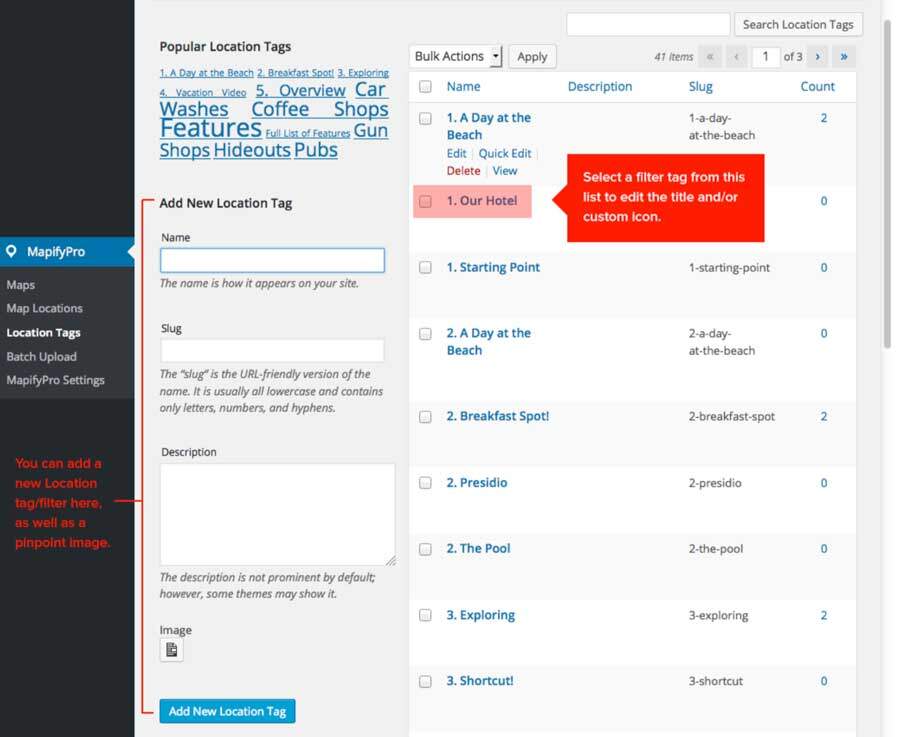
By default, the interactive list will use the icon assigned while setting up your location. However you may wish to use a different icon for the filter than what you used on the actual location markers, so here’s how you’d do that:
1. Under the Location Tags tab, click on one of the tags that are in list format (see above image for reference).
2. You will then see the following page. Using this image as a reference, you can see how easy it is to assign a custom icon to a filter tag:
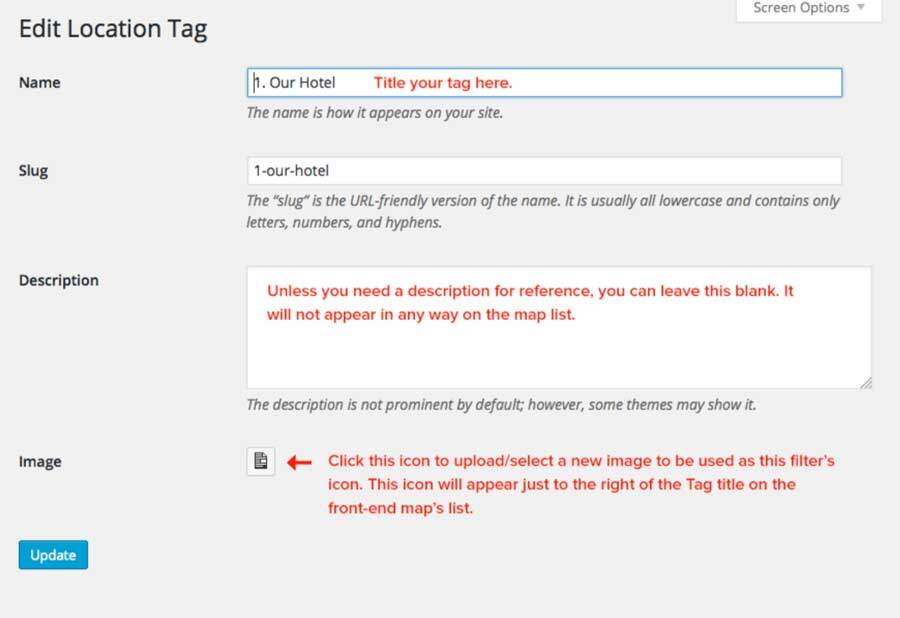
3. Click “Update” and that’s it. You now have a custom icon on the filter, which will appear as shown below on your filter list:
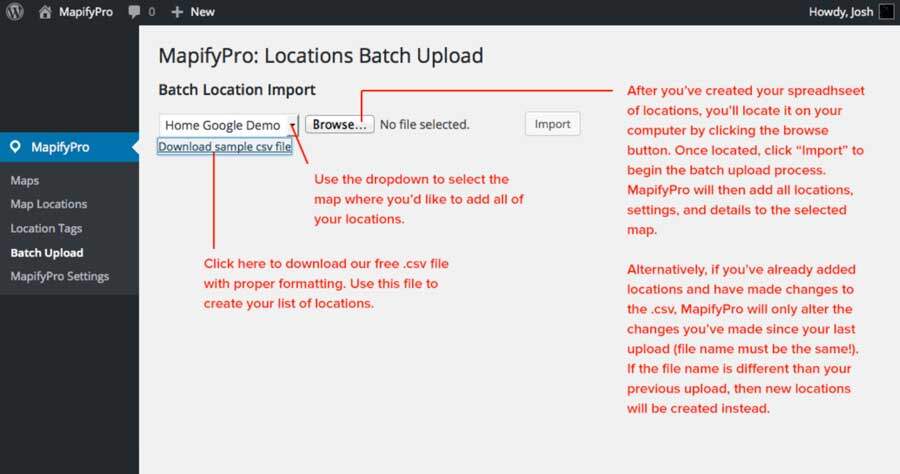
7. Batch Upload ⇧
You possibly have a lot of locations to upload, and MapifyPro includes a lot of features for each location. So, we’ve devised a method of batch uploading your locations in a single upload. This feature supports the uploading of a .csv spreadsheet, which we provide in the proper format. This spreadsheet allows you
to specify the setting of each core feature for every location you have. It can be a touch tricky, so we recommend starting with 5-10 locations until you get comfortable with the formatting, but once you get the hang of it, you’ll cut back your workload significantly.
Futhermore, the method used by MapifyPro’s batch upload feature treats your .csv file as a database. So, making changes to any item within the .csv will ONLY change that setting in the location, while ignoring the items that haven’t changed. This allows you to maintain a separate database of locations (your spreadsheet) and update as needed without creating duplicate locations once you upload it. See below for an overview of what you’ll see:
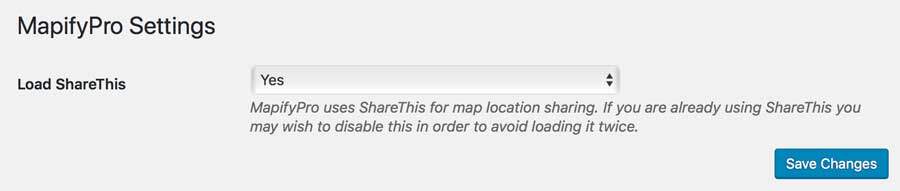
8. MapifyPro Settings ⇧
This section is a small setting that controls our 3rd party sharing solution, which is used for sharing locations across various social media sites. This is set to ‘Yes’ by default and can pretty much be ignored, as it is simply used for troubleshooting. For example, if you already have “ShareThis” loaded as a separate plugin, you can set this to ‘No’ to prevent it from loading twice on your site and causing potential conflicts.
9. Adding a Blog Post to a Map ⇧
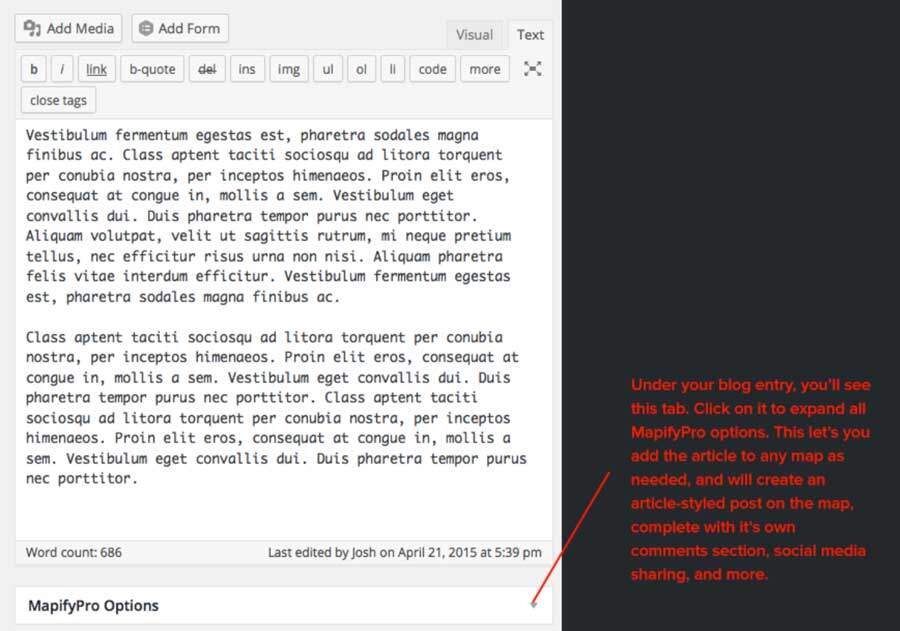
By this point you’re probably very familiar with adding locations to a MapifyPro map. Since locations are actually just like posts, MapifyPro integrates 100% with ACTUAL blog posts too (an amazing feature for travel bloggers, restaurant reviews, etc.). To add an article to any of your maps, you’ll write the article under your “Posts” section, just as you would any blog entry. The only difference is that you’ll notice a new section has been added under the blog article section, that being “MapifyPro Options”. This is the section where you’ll add the article to any maps as needed, just as you do when creating normal map locations.
To do so, you’ll want to expand the “MapifyPro Options” tab under your article, as seen here:
All Map Location settings found in this tab are the exact same ones we covered in section IV, so refer to that section for details on each feature.
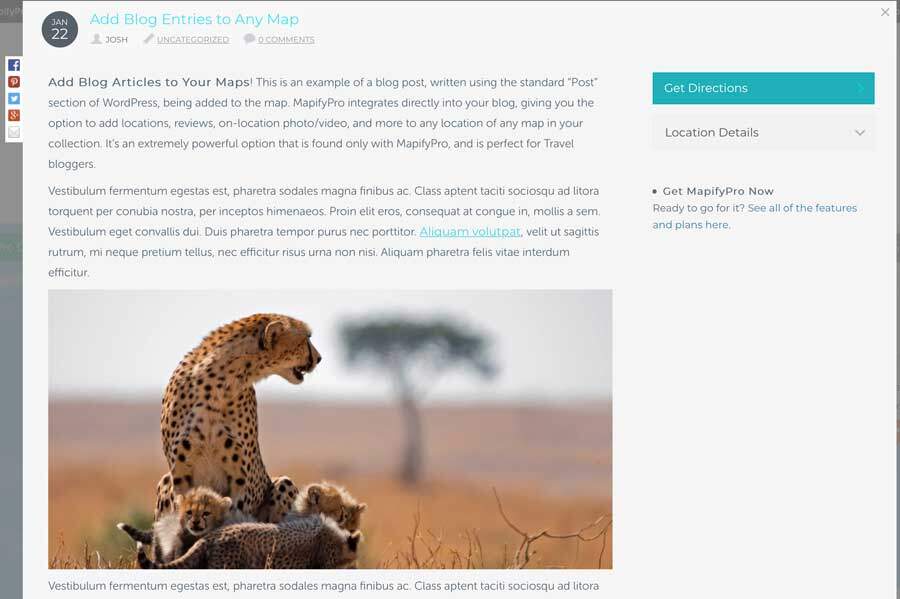
Since MapifyPro’s location pop-ups are dynamic, after you’ve added a blog post to a map, it will automatically be formatted based on your style options that you set in your map settings (See section III for more details.). So the header and accent colors will reflect your style choices. Furthermore, the posts will be complete with their own comments section, sidebar, and sharing options. Lastly, the article will still be added to your normal blog, and will not affect the style of the blog itself. Check out the screenshot below to see an example of a blog post and how it appears on the map! Note also that these pop-ups are 100% responsive, include inline comments, and more! It’s the perfect feature for those who’d like to write blog posts about their travels.
10. Add Ons ⇧
MapifyPro supports add-ons that let you customize your maps even more than the core features. For example,
• PrettyRoutesPro lets you add unlimited, colorful routes to your maps, and serves as a powerful add-on to MapifyPro, or a stand-alone product: Get PrettyRoutesPro Here
• CrowdMaps lets ANY visitor add locations to your map, which is perfect for building communities, encouraging traffic, and building a crowd-sourced collection of map locations: Get CrowdMaps Here
We are constantly adding new add-ons, so keep tabs here: MapifyPro Add-Ons
11. Useful Links and Support Forum ⇧
News and Updates: Latest news, video tutorials, case studies, and freebies: Visit the MapifyPro Blog
Facebook: Get the latest promo codes and more by liking us on Facebook
Twitter: This is the easiest way to receive up to date news and updates on the nitty gritty details of apifypro, such as releases, what we’re working on, and more. Follow us here on Twitter
NEED SUPPORT?
MapifyPro comes with extensive support and a details FAQ that covers common issues. If you’re still having trouble after reading this documentations, feel free to visit our knowledge base and support system here:
MapifyPro Support Ticket System
FAQ
How to install MapifyPro?
1. As with any WordPress plugin, you’ll want to upload the MapifyPro plugin file (mapifypro_master.zip) in your ‘Plugins’ tab in your WordPress admin.
2. Under the ‘Plugins’ tab, click “Add New’
3. At this point you will see a selection of WordPress plugins, but you can ignore them and simply click ‘Upload Plugin’
4. Click the ‘browse’ button and locate your mapifypro_master.zip file that you downloaded after purchasing MapifyPro.
5. After the plugin uploads, select the ‘Activate Plugin’ option. That’s it! You’ve successfully installed MapifyPro and are ready to activate your API Key.
Filed under: Tutorials, Documentation